Client Onboarding
- Getting set up on the Lonely Viking Project management system.
- Web development project feedback and content sharing.
- Setting up and requesting subscription payments on PayFast
- Sharing Google Analytics and Google Tag Manager Access
- How to get your Google reCAPTCHA API Keys
- How to get your Google Maps API Key
- Getting your Google Tag Manager code
- Adding tags to Google Tag Manager
Getting set up on the Lonely Viking Project management system.
A quick walkthrough of the Lonely Viking project management system where you can see the progress of your project, view tasks, upload files, participate in discussions, track progress.
Web development project feedback and content sharing.
It's time for us to get content and feedback from you for the project we are working on together. Please watch this short video to see how we do that in a super-easy and effective way.
We are looking forward to completing your project successfully with you. Our feedback system greatly speeds up the process which means your project can be live sooner if you use it.
Setting up and requesting subscription payments on PayFast
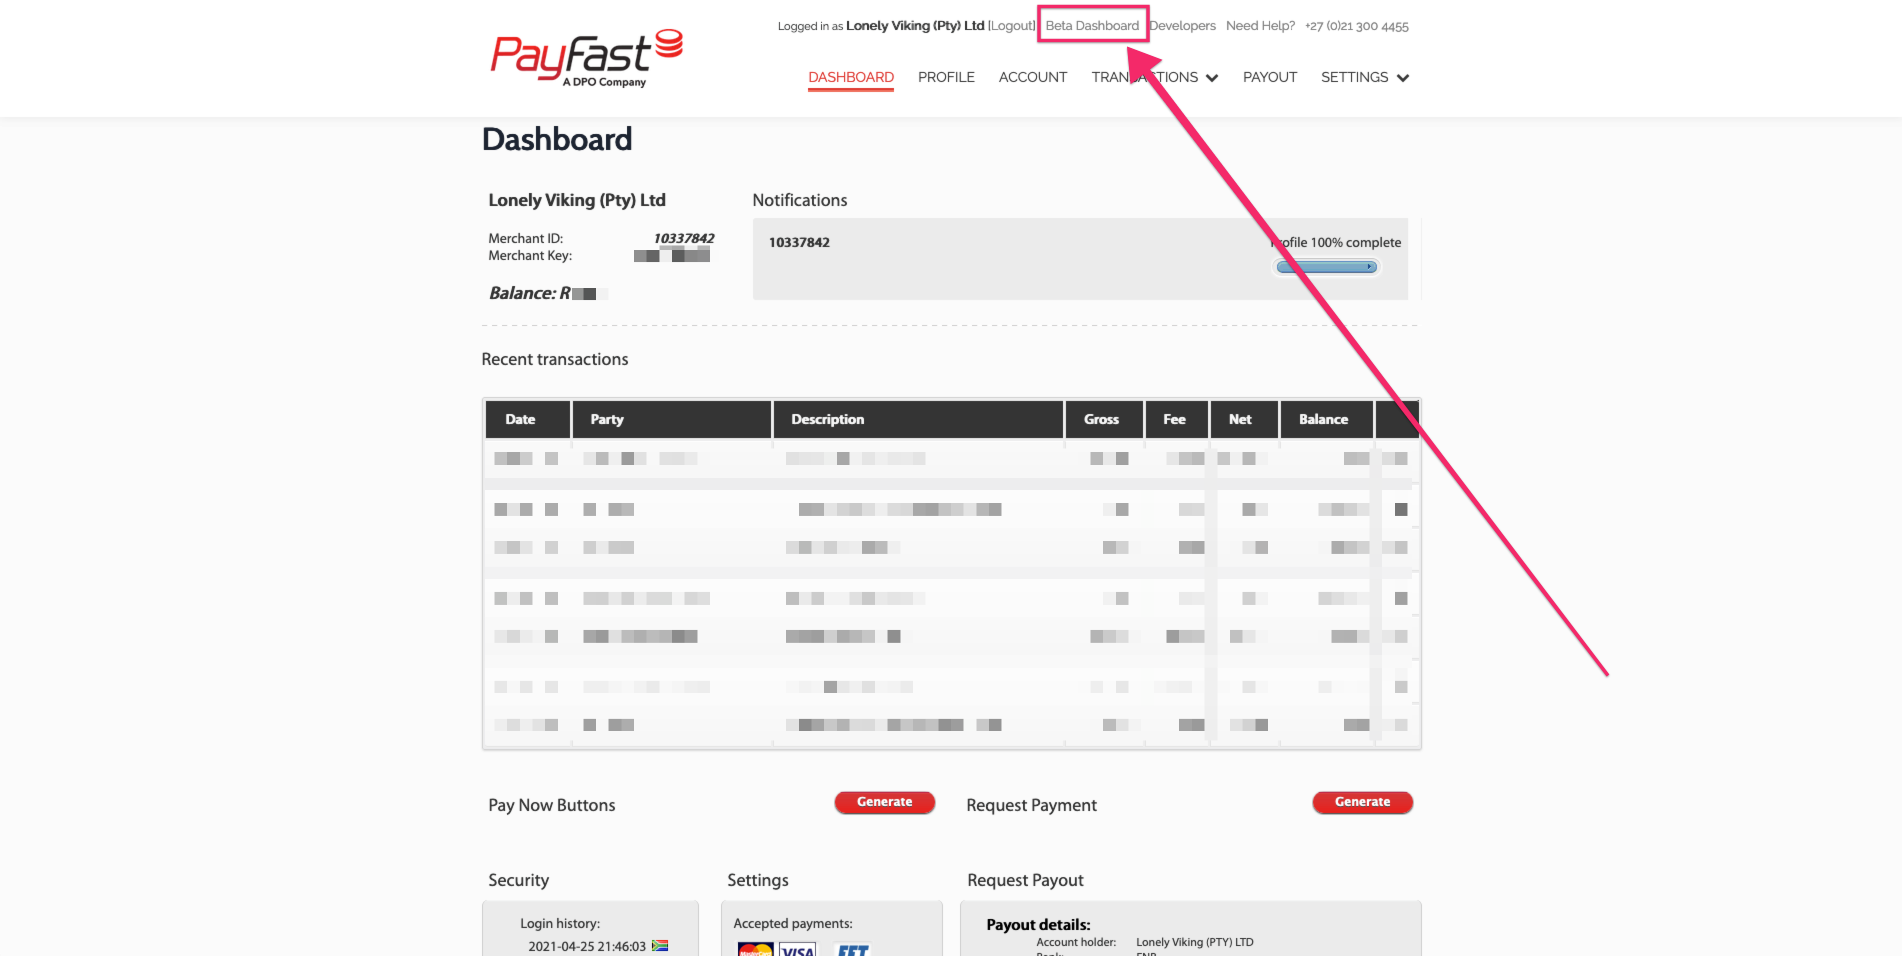
- PayFast's new dashboard is way better so click on 'Beta Dashboard' if you aren't there already

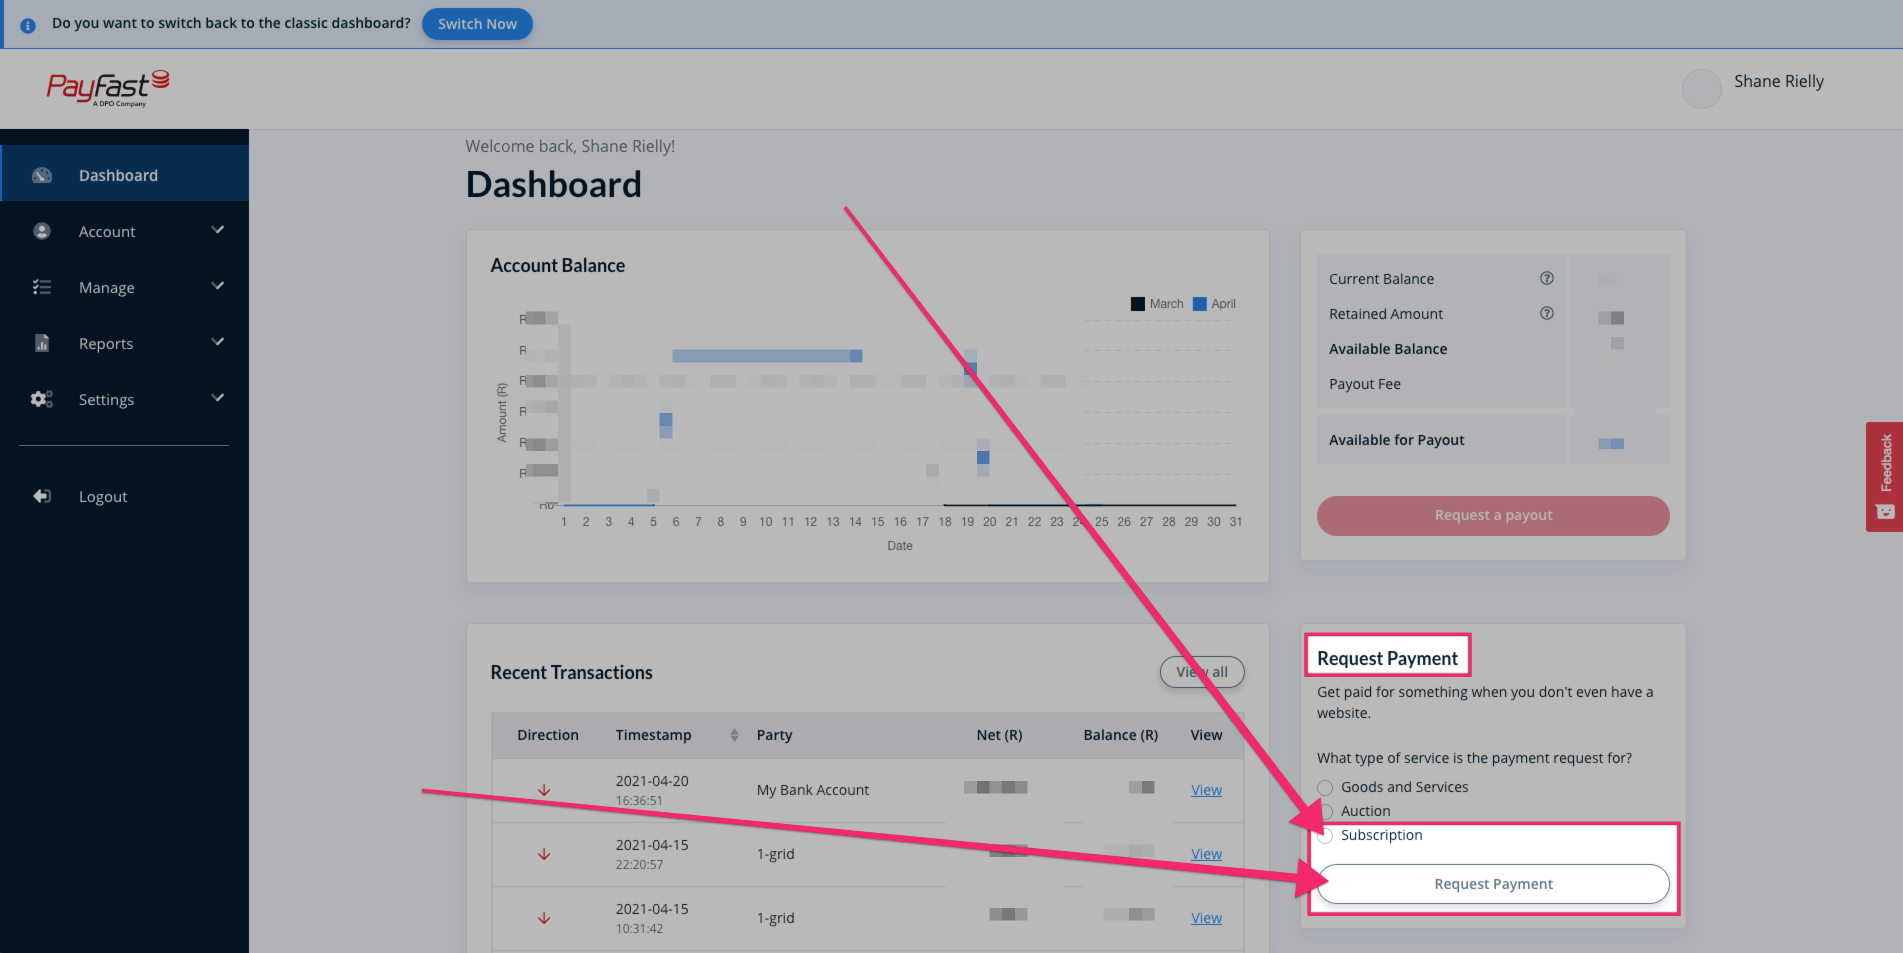
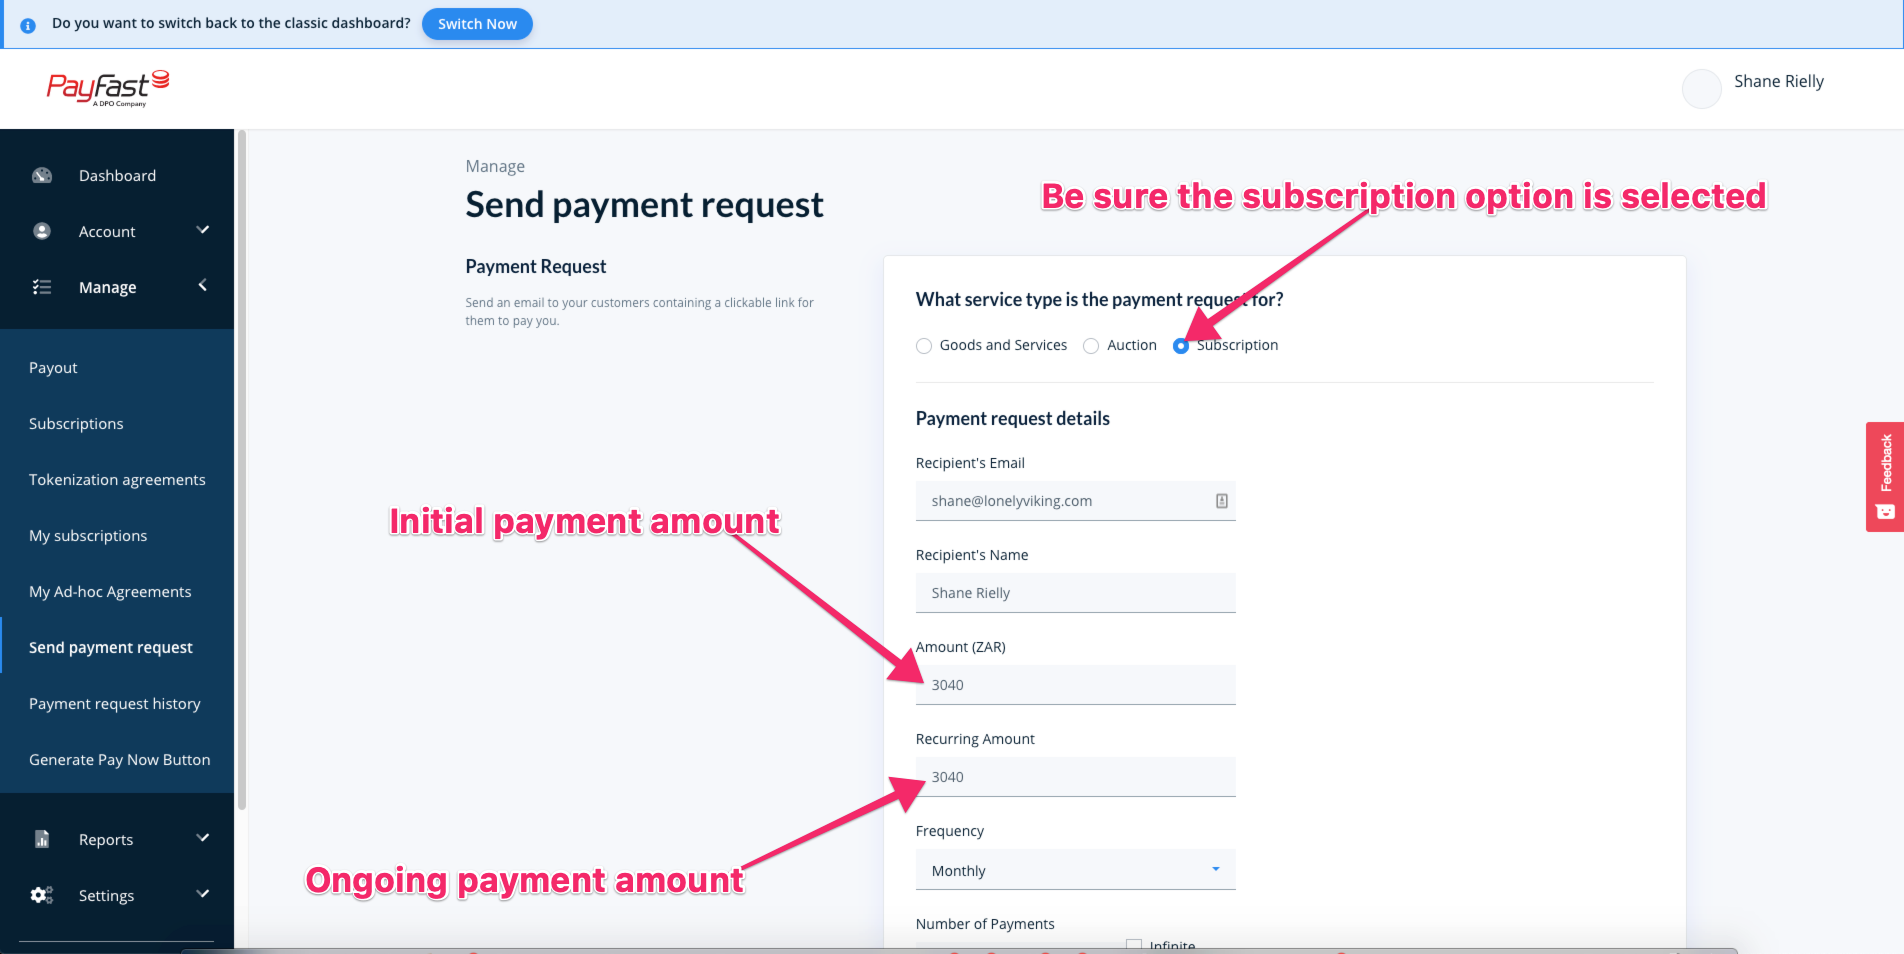
- On the dashboard, select the 'Request Payment' option at the bottom-right of the page

- Fill in the details for the subscription in question

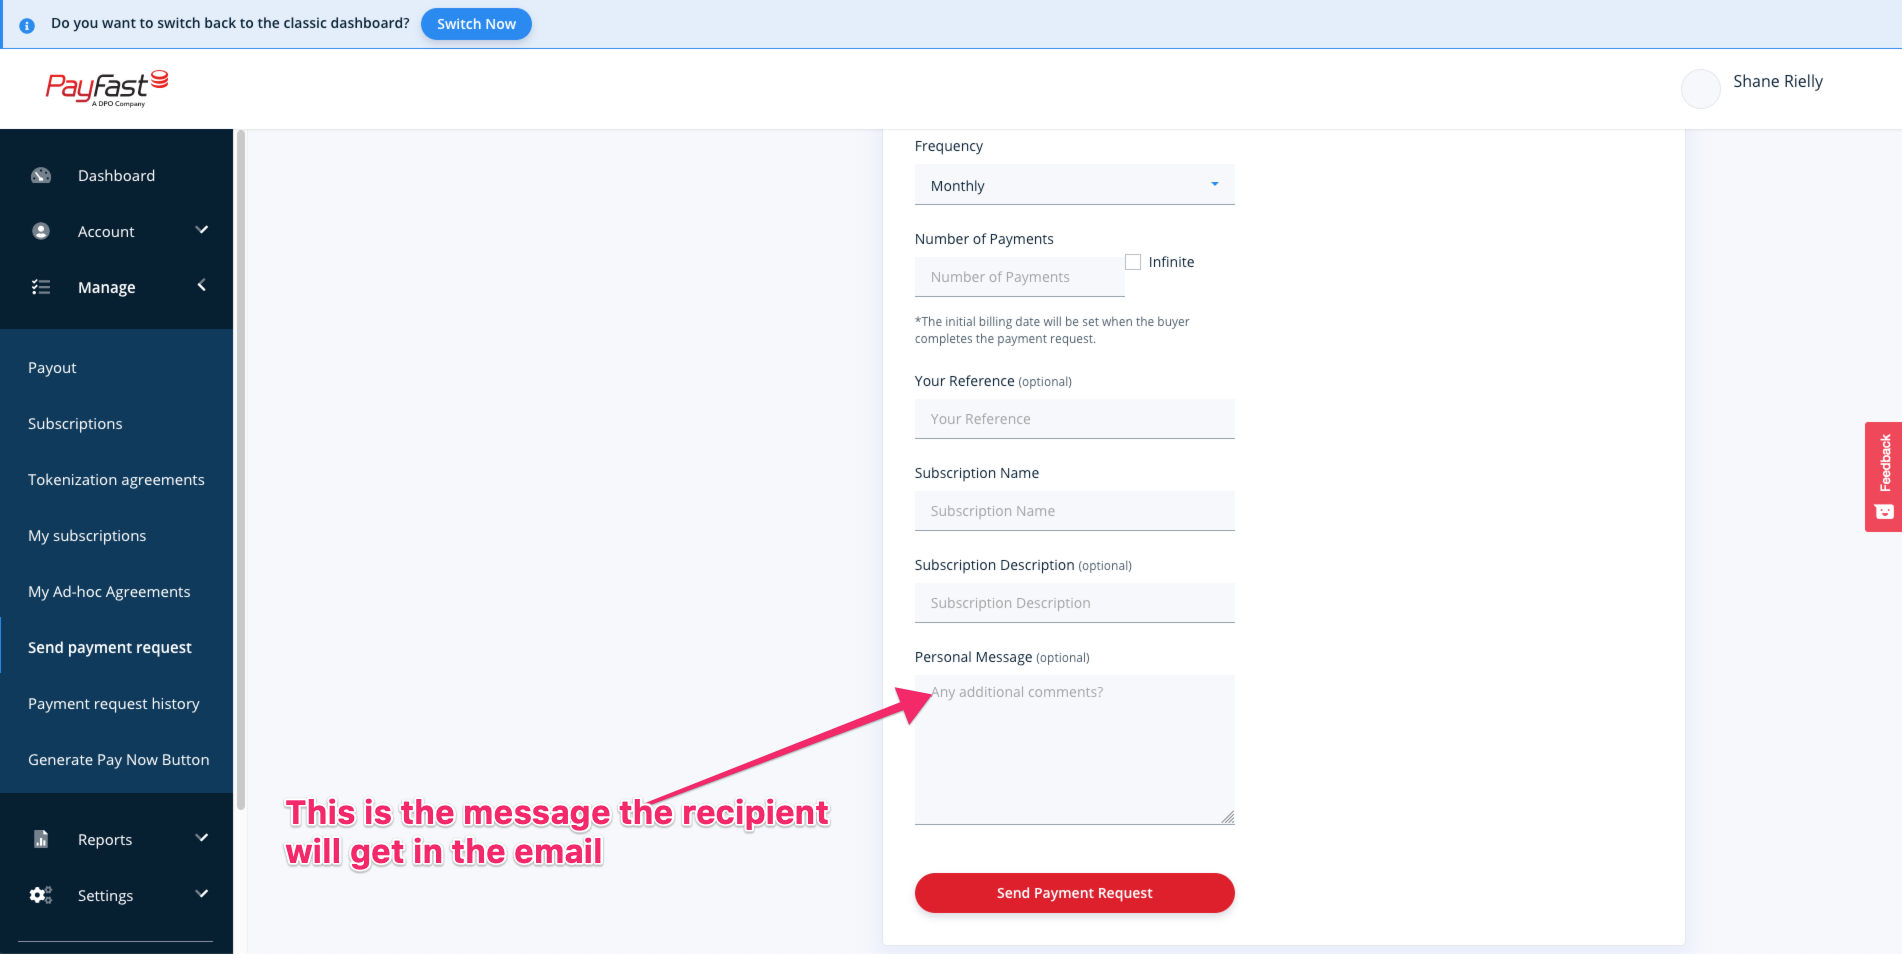
- Give the Subscription a meaningful name and write a personal message for the member if you want to (probably best to have a predefined message that you can copy/paste each time)

- Click send to send the subscription request to the member
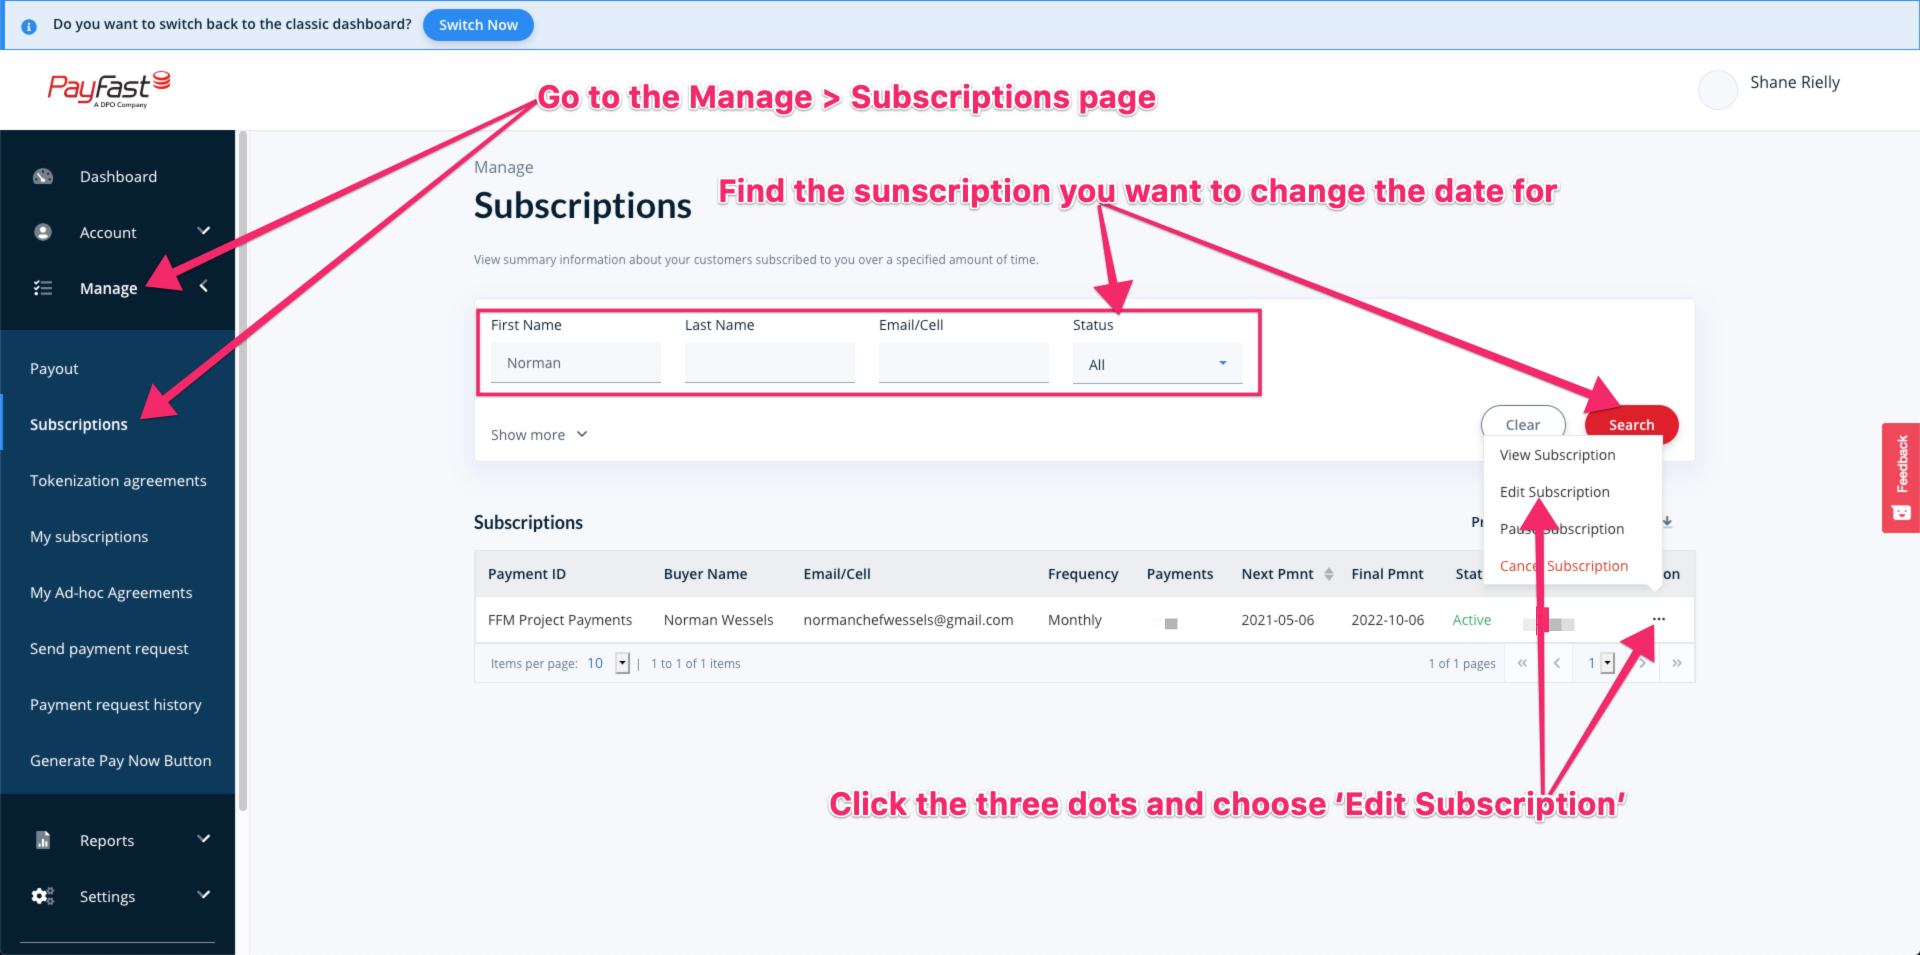
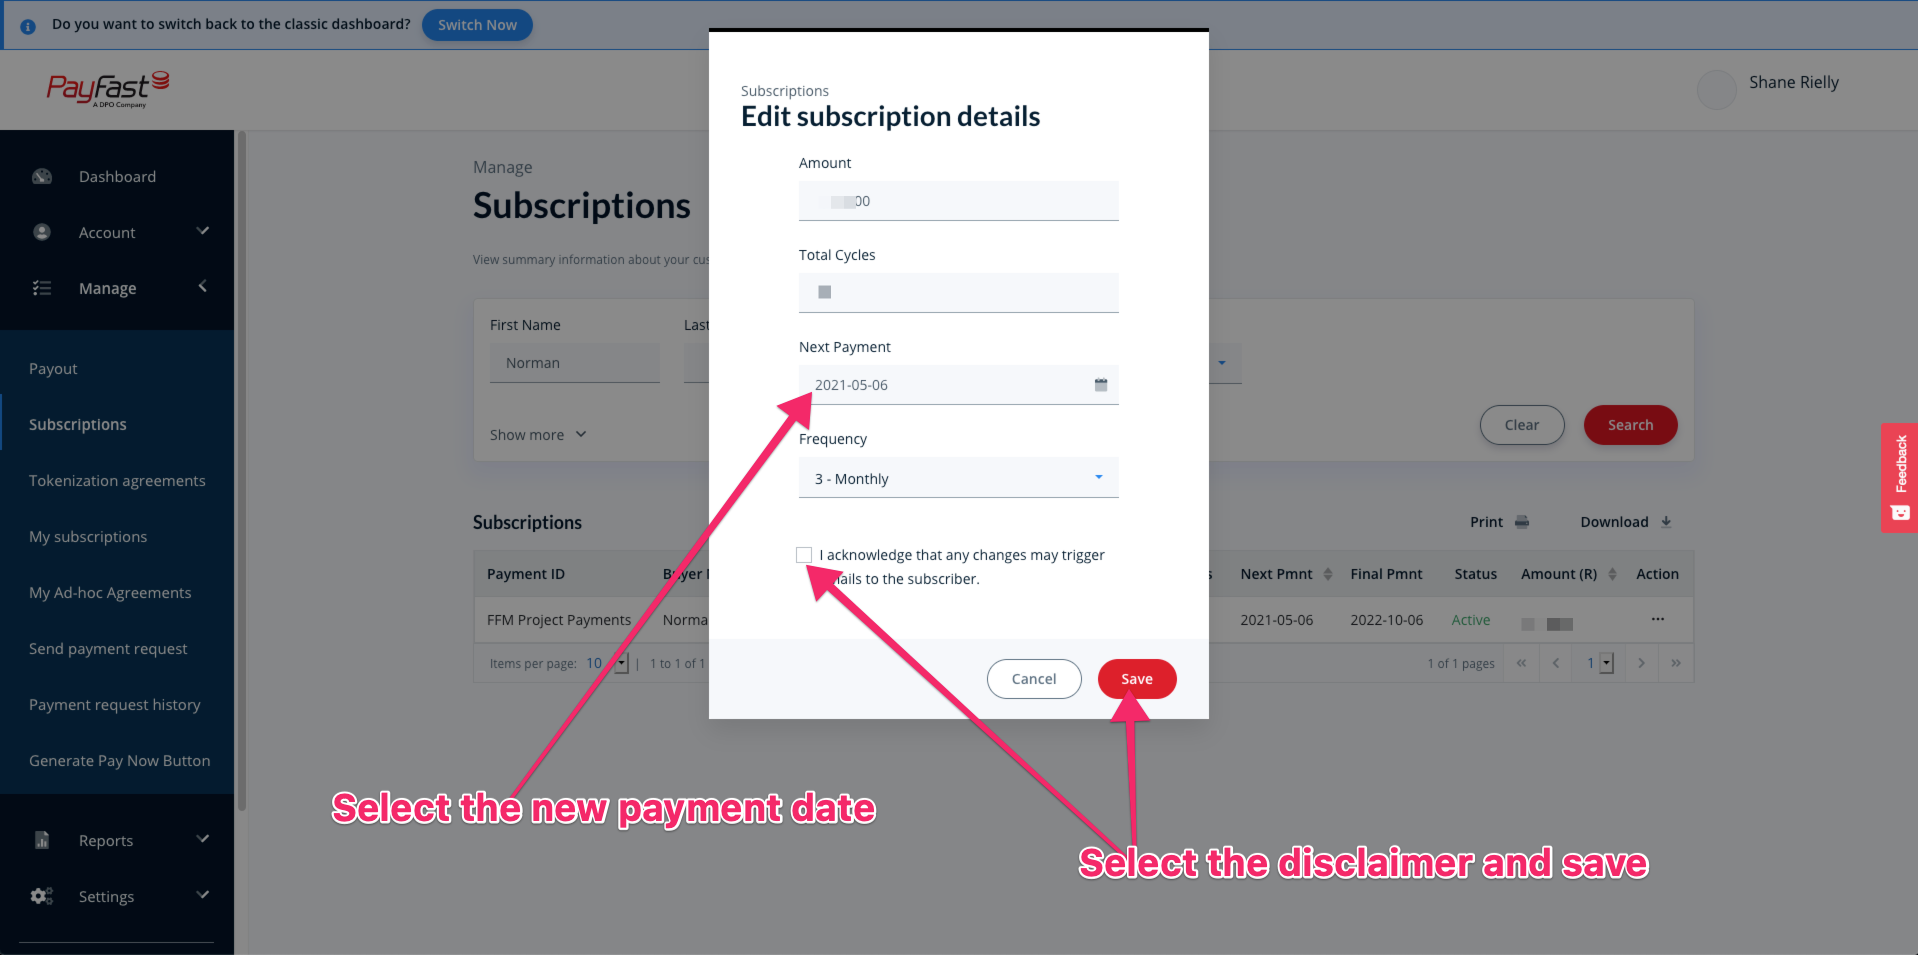
- Go to the Manage Subscriptions page and find the sub you want to edit the date for

- Edit the date on the popup that comes up

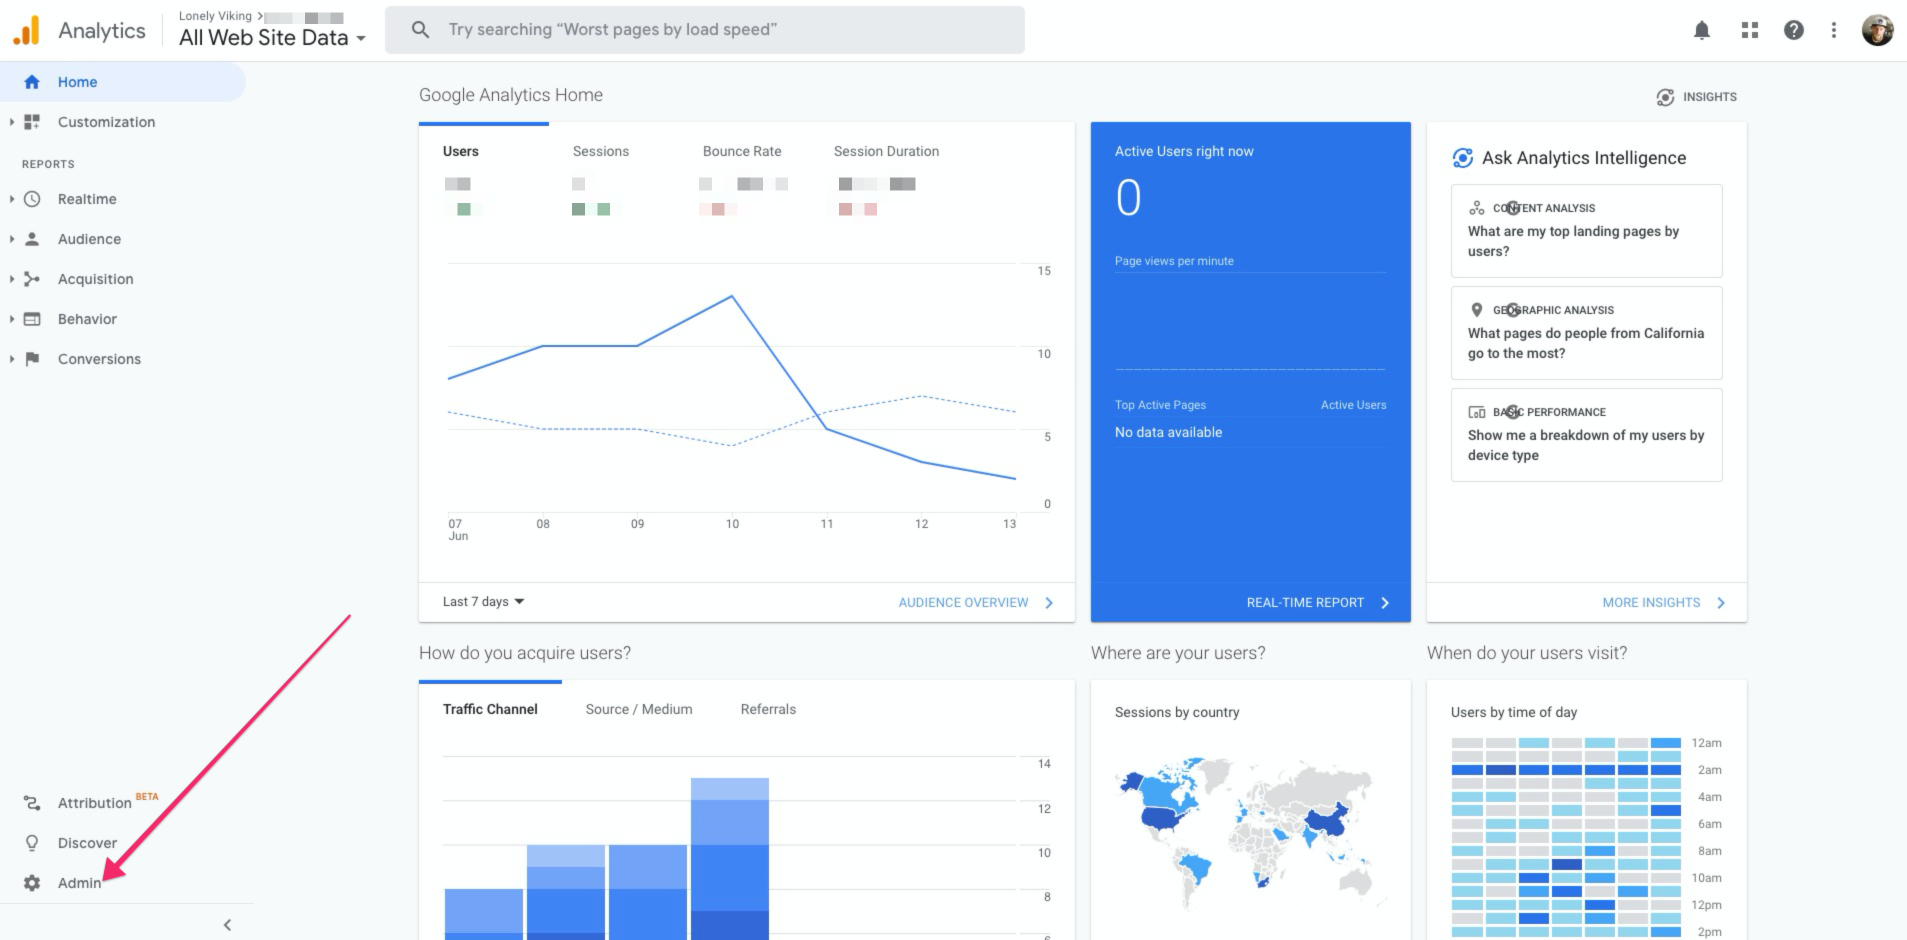
Sharing Google Analytics and Google Tag Manager Access
We want to make sure that Google Analytics is properly set up on your website so that when users visit your site everything is tracked correctly, and you get the best metrics possible to understand how people are using your websites.
In order for us to do that we're going to either need access to your Google Analytics and Google Tag Manager accounts, or we are going to need information from you that we can use in order to set up the tracking correctly on your website.
Below are two scenarios of how we can go about that.
1. Grant Us Administrator Access
The first option is for you to give us administrator access to your Google Analytics and Google Tag Manager accounts. This is the most seamless option because we can create everything needed and you don't need to worry about it. That being said, some clients do not want that data and access to be available to 3rd parties, in which case option 2 below is the way to go.
Google Analytics
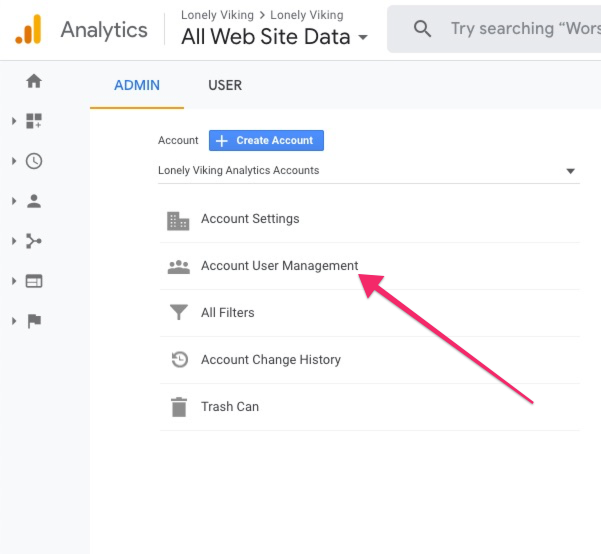
- In your Google Analytics Account click on the Admin link at the bottom right

- Click on Account User Management

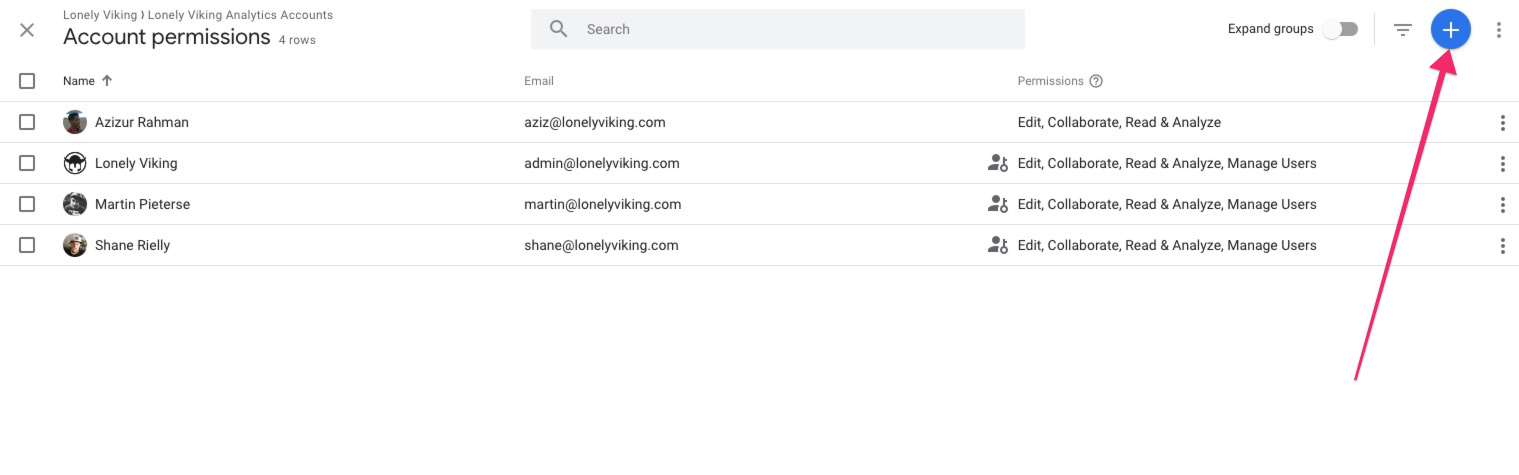
- Click the + icon at the top right

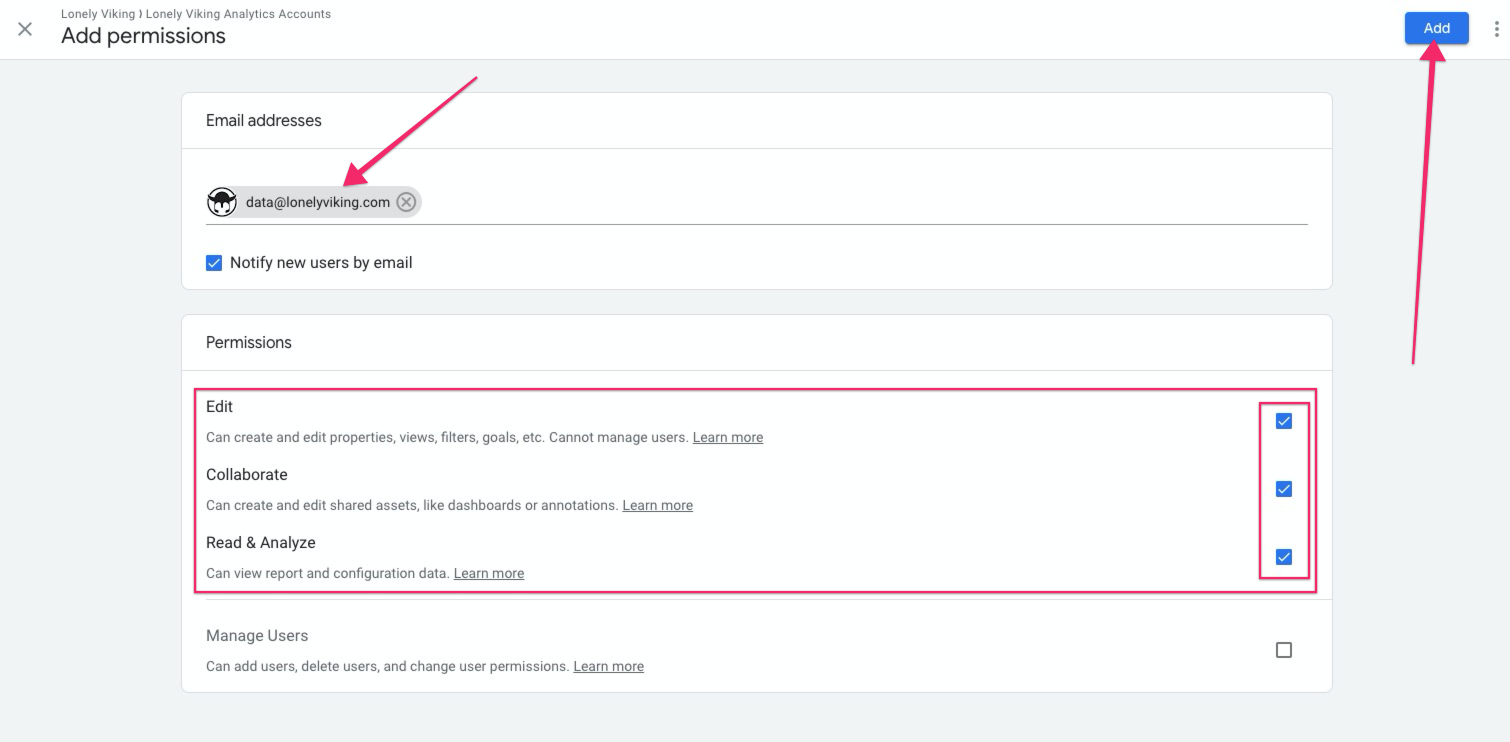
- Add data@lonelyviking.com as a new user and be sure to select the 'Edit' option under the Permissions Section. Once you are done, click the 'Add' button at the top right.

- That's it for Google Analytics 😁
Google Tag Manager
Google Tag Manager not only allows us to add Google Analytics tracking to your website, but also any other scripts that might need to be added for other 3rd party systems like booking systems, payment gateways etc. Having access to manage your Tag Manager Containers is hugely beneficial for us and makes everything more hands-off for you.
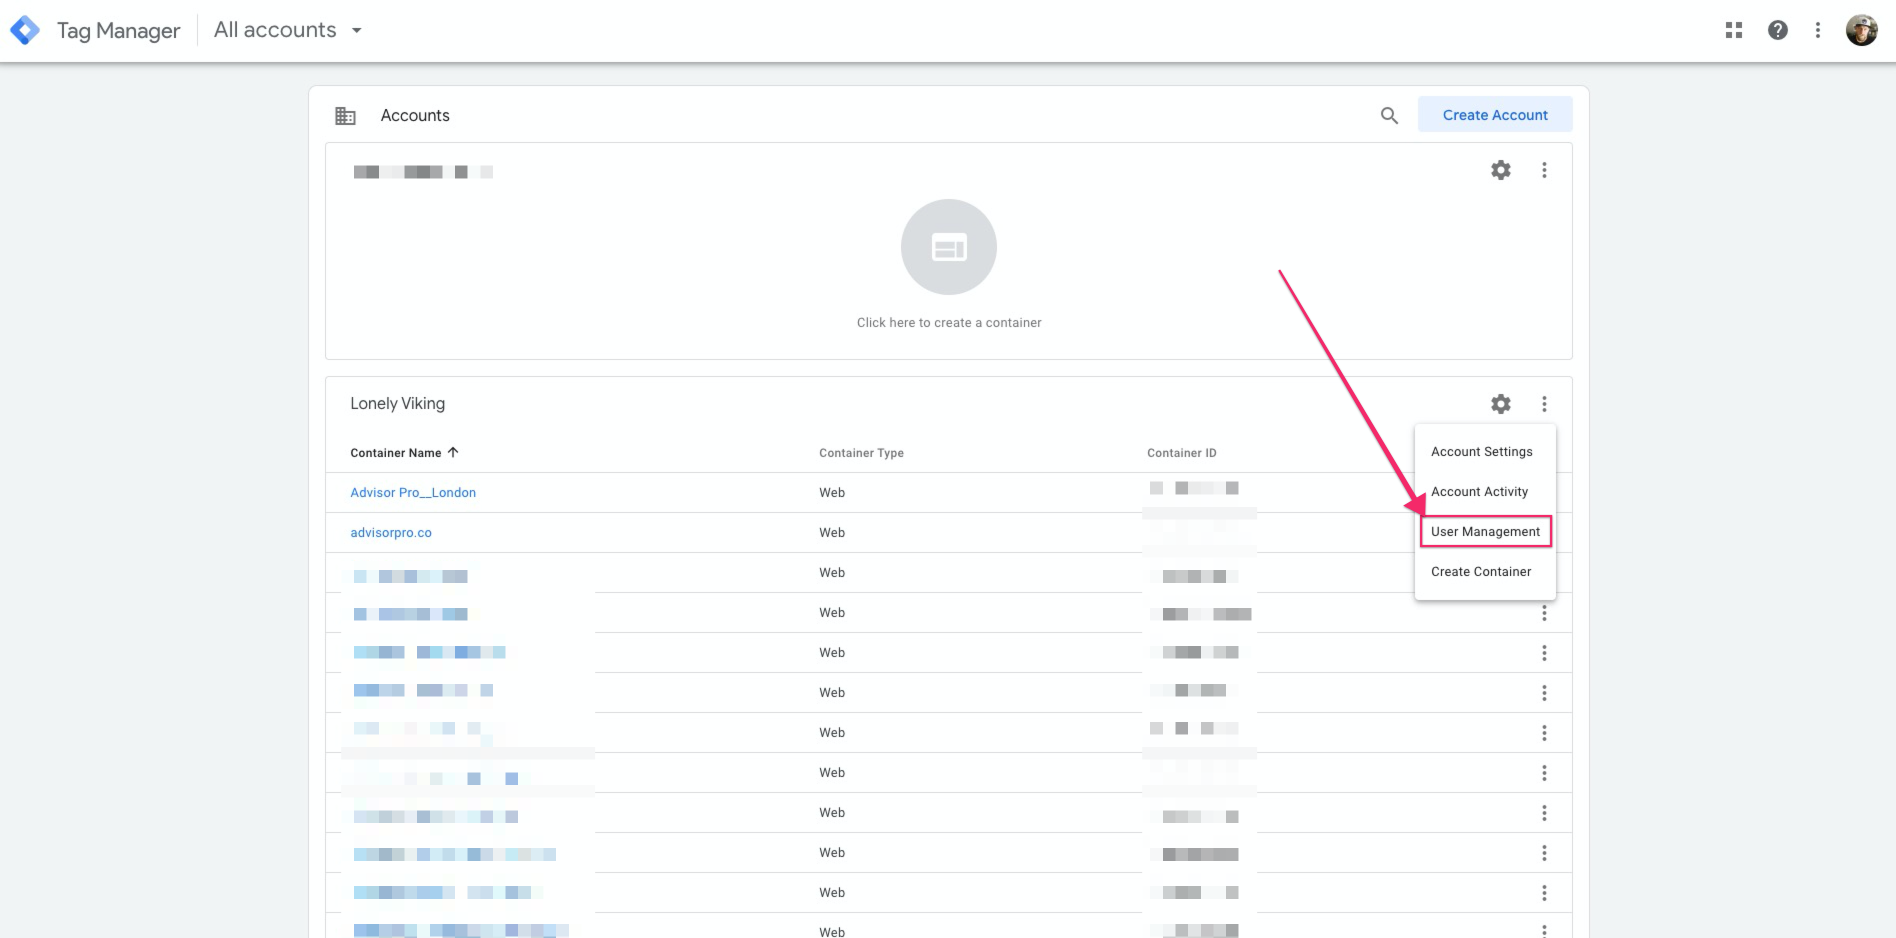
- Go to https://tagmanager.google.com/#/home
- In the section for your account, click on the 3 dots at the top right and select 'User Management'

- Now click the + button at the top right and then click on 'Add Users'

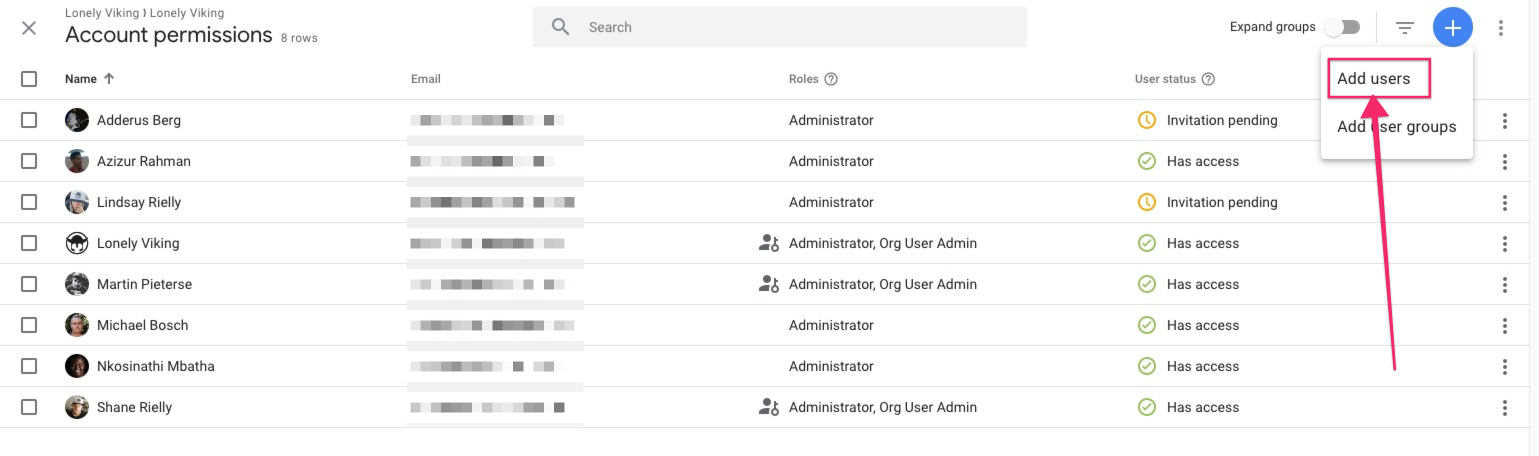
- At this stage you need to do the following:
• Add data@lonelyviking.com in the Emial Addresses section
• If you have no containers created yet, you will need to make sure that the 'Administrator' option is selected under 'Account permissions' so that we can create and manage containers for you.
• If you already have a container you will need to click on it and make sure that the permissions for it are set to 'Publish'. You may still want to give us Administrator permissions to avoid back and forth in case something is not set correctly.
• Now click on the 'Invitation' button at the top right to provide us with access.
- That's it for Google Tag Manager 😁

2. Send us the relevant codes
If, for whatever reason, you do not want to give us access as shown above you can provide us with the relevant tracking codes yourself. Here's how you do that.
Google Analytics
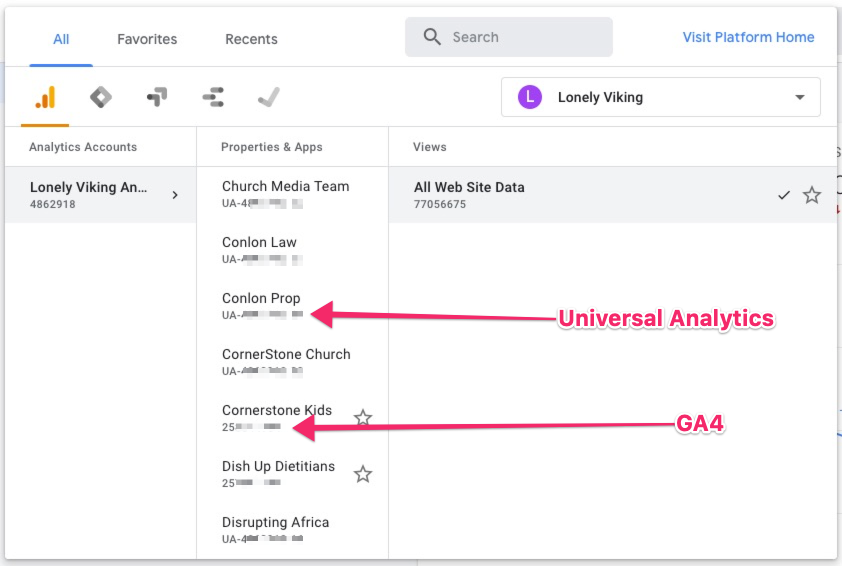
- Go to https://analytics.google.com/analytics/web/#/ and make sure you are logged in to you Google Account that manages the Analytics Property for your website.
- Click on the dropdown just next to the Google Analytics logo at the top right to view all of you properties. You may only have one Property. If you have none please create one or give us access so we can do that for you (details for how to do that at the top of this entry).

- Send us the tracking ID shown under your website's corresponding Property. Older Universal Analytics properties will have an ID prepended with 'UA-' and newer GA4 properties will be a 9-digit number.

- That's it for Google Analytics 😁
Google Tag Manager
Please note that if you merely send us the Google Tag Manager tracking ID you will be responsible for making sure that Google Analytics has been added to your Google Tag Manager container correctly and that your container is properly maintained with any other scripts required on your website for other services like booking applications, payment gateways etc.
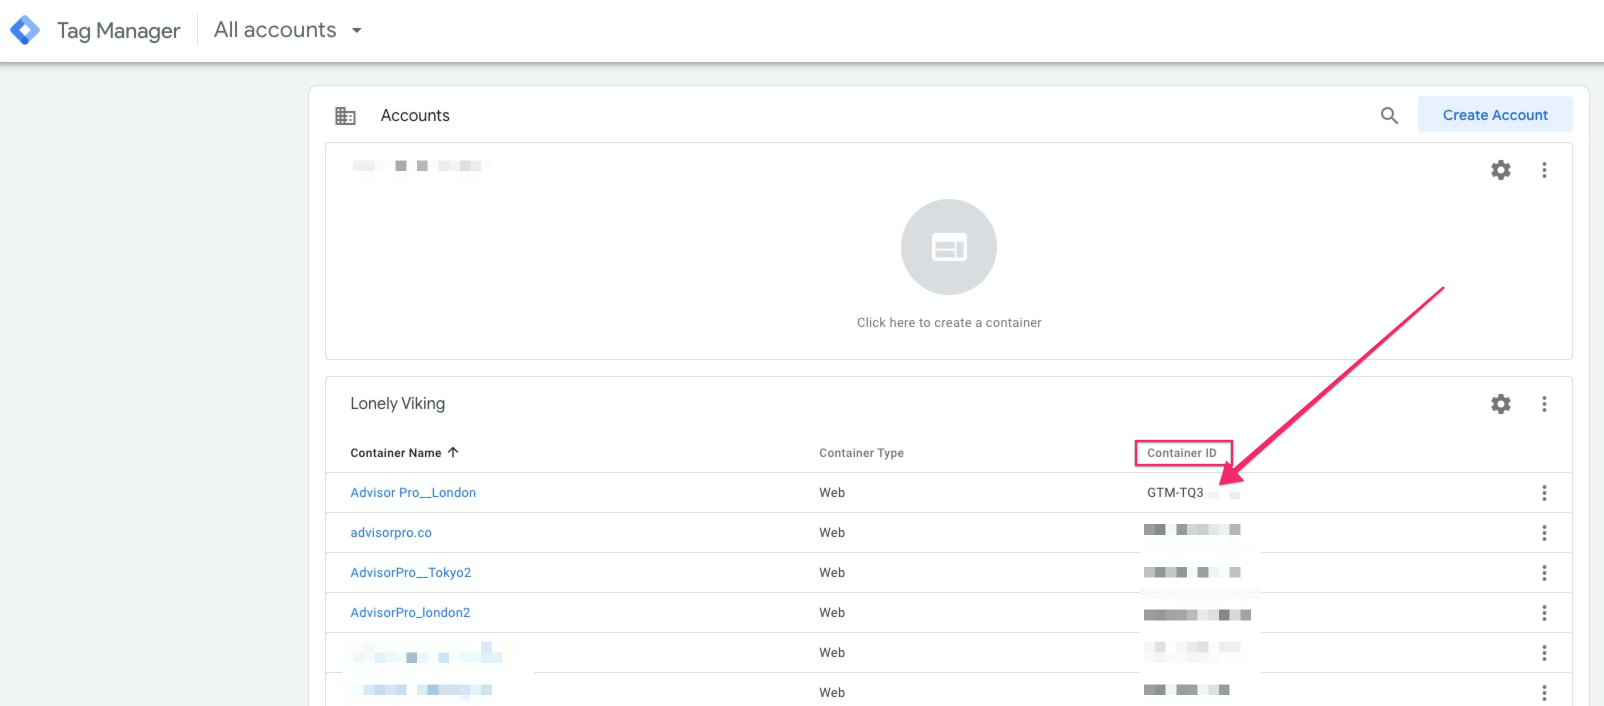
- Go to https://tagmanager.google.com/#/home
- In the section for your account, look for your container and send us the ID displayed in the 'Container ID' column. Note that you may only have one container. If you have none please create one or give us access so we can do that for you (details for how to do that at the top of this entry).

- That's it for Google Tag Manager 😁
I hope this guide was helpful for you! If you have any questions, please let us know.
How to get your Google reCAPTCHA API Keys
Google reCAPTCHA is a way to prevent spam submissions from being submitted via the forms on your website. In order for us to implement Google reCAPTCHA on your website, we're going to need the relevant API keys.
Here's how you can go about getting those keys and sharing them with us.
Create Google reCAPTCHA API keys
Follow these steps to create the API keys so that you can send them to us.
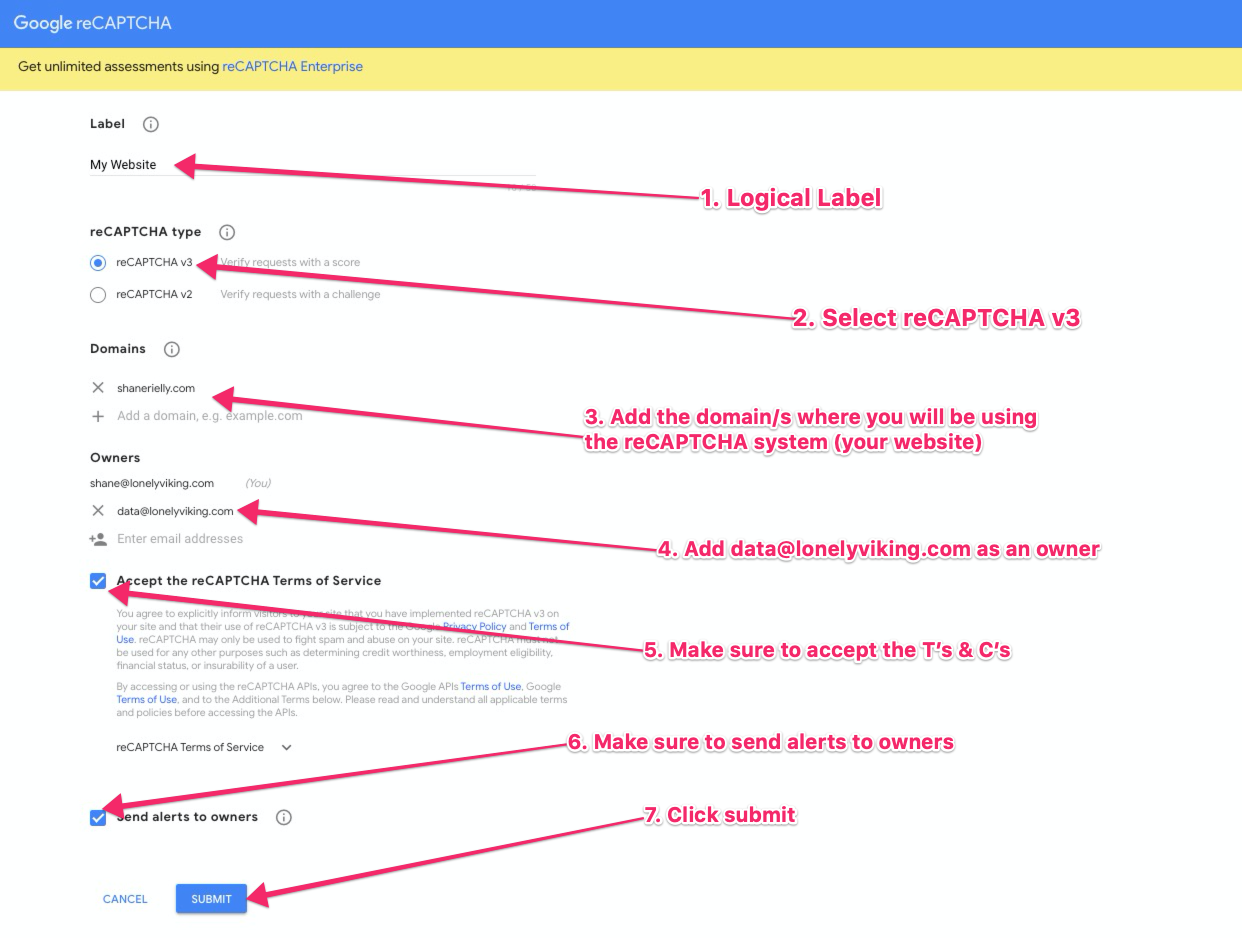
- Go to https://www.google.com/recaptcha/admin/create
- Complete the steps on the page as shown in the screenshot below:

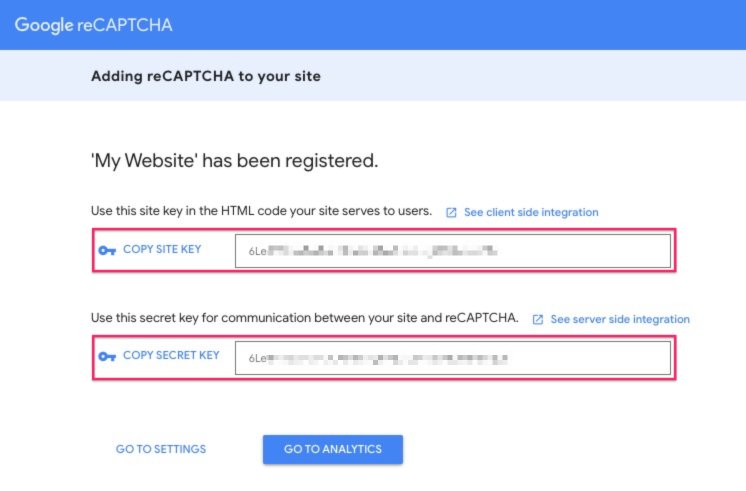
- On the next page you'll find the SITE KEY and SECRET KEY for your website's new reCAPTCHA. Send those through to us.

- That's it for Google reCAPTCHA 😁
I hope this guide was super helpful for you! If you have any questions please let us know.
How to get your Google Maps API Key
If you would like interactive Google Maps to be running on your website so that your users can interact with the maps, see location pop-ups and things like that, then we're going to need an API key for your Google Maps. Below is a guide showing you how to create the API Key needed.
Create and send us the API key
Follow these steps to create the API keys so that you can send them to us.
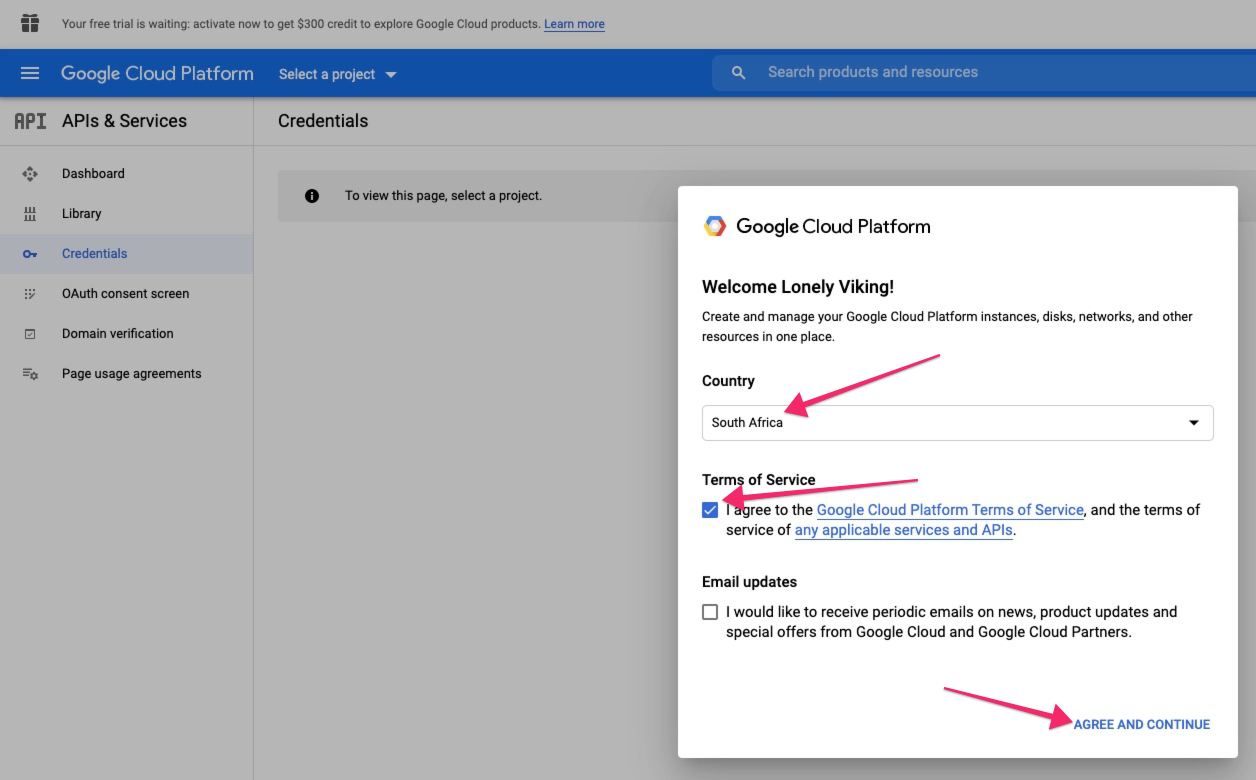
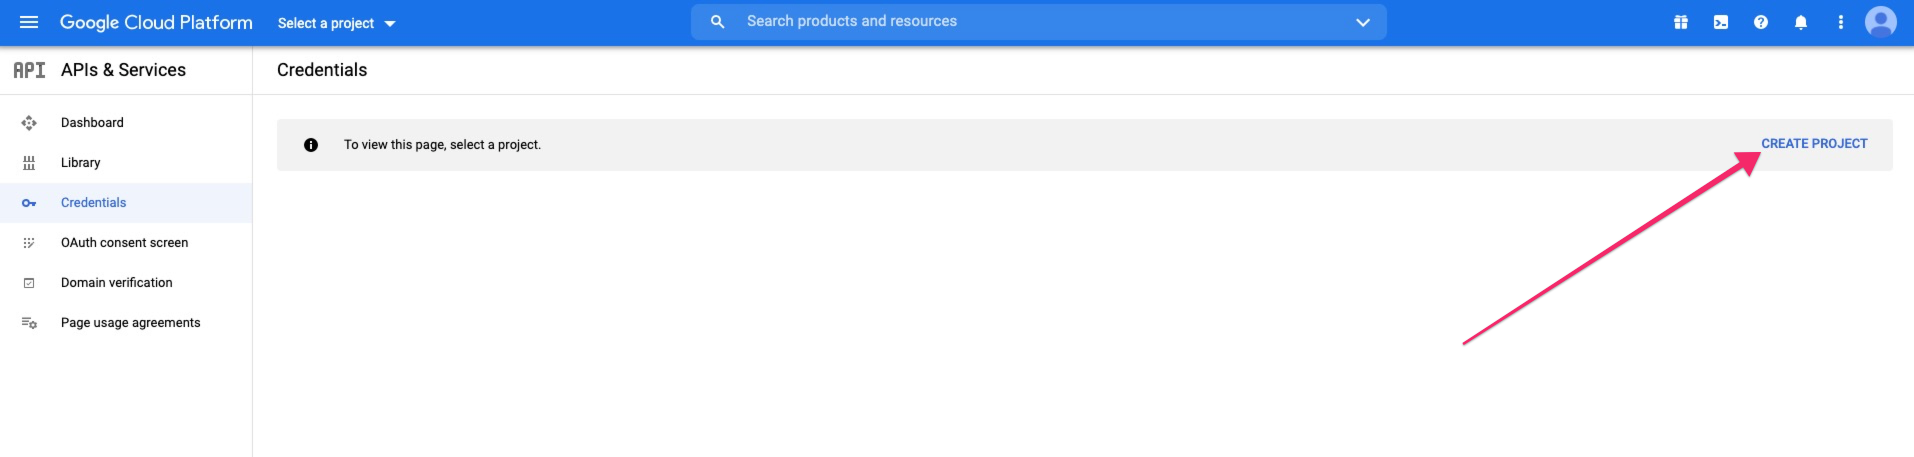
- Got to https://console.cloud.google.com/project/_/apiui/credential
- If you have never set up an account before, complete the popup by selecting your country, accepting the Ts & Cs and clicking 'AGREE AND CONTINUE'

- Create an new Project by clicking on 'CREATE PROJECT' at the top right of the page

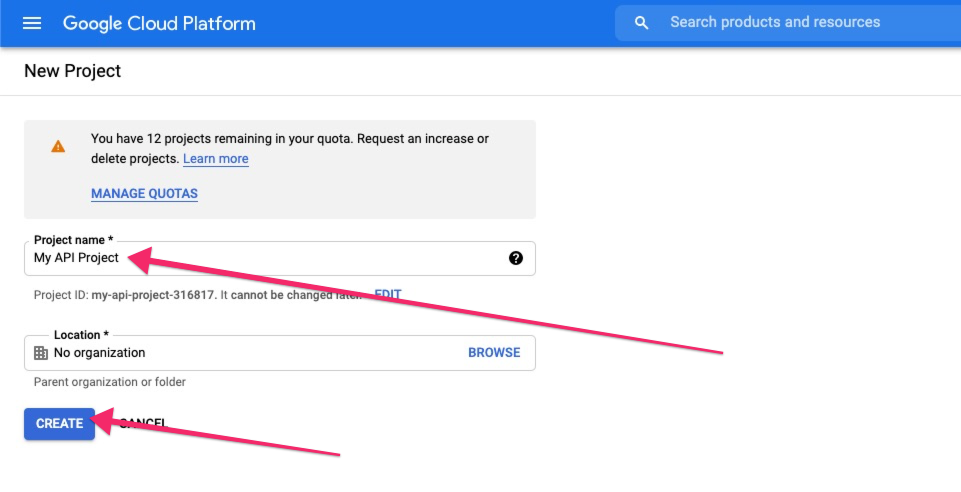
- Give your new project a logical name (your business or website name should be fine) and clicking on the create button

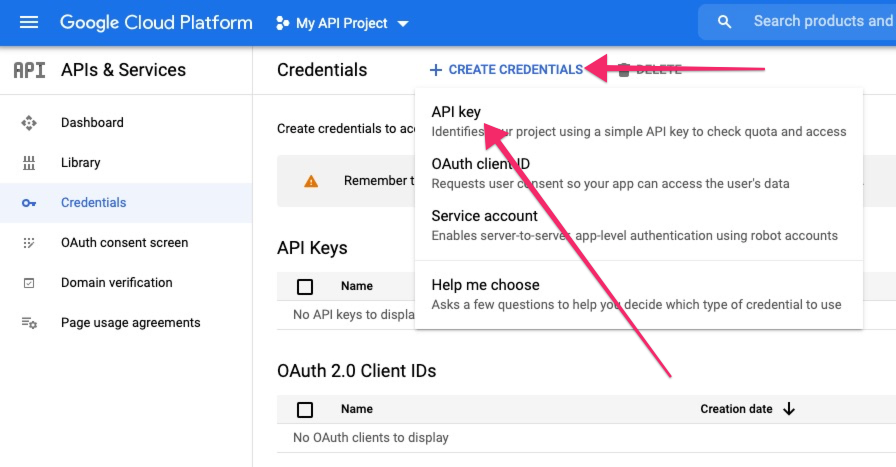
- Once you've created a project, click on the '+CREATE CREDENTIALS' option at the top of the page and selecting 'API Key' from the dropdown options

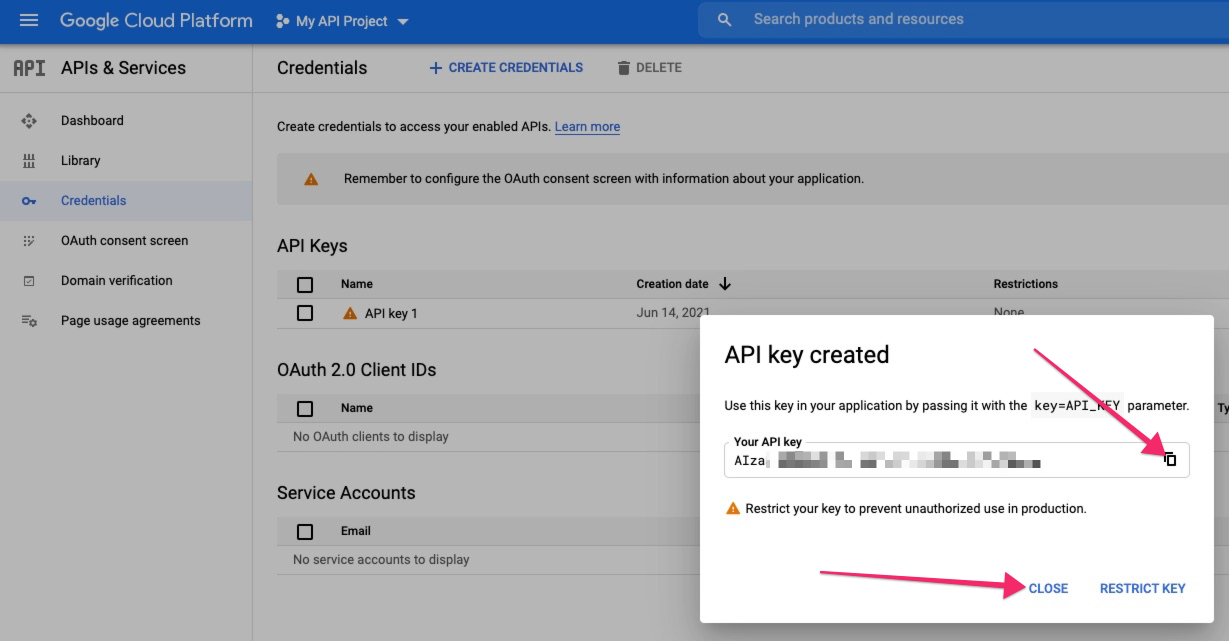
- Copy your new API Key, close the tab and send the key to us

- One last step is to enable the Google Maps Embed API so that your new API Key can be used on the correct Google Function.
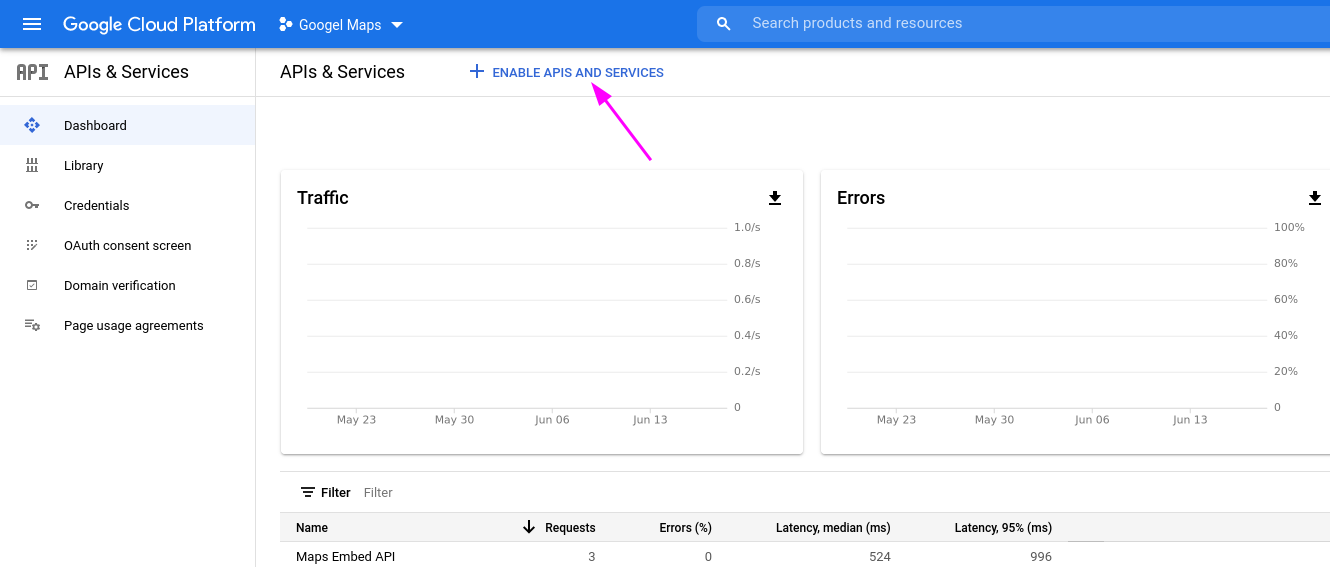
- Navigate to https://console.developers.google.com/ (the default Dashboard) and click 'ENABLE APIS AND SERVICES' on the top toolbar
-

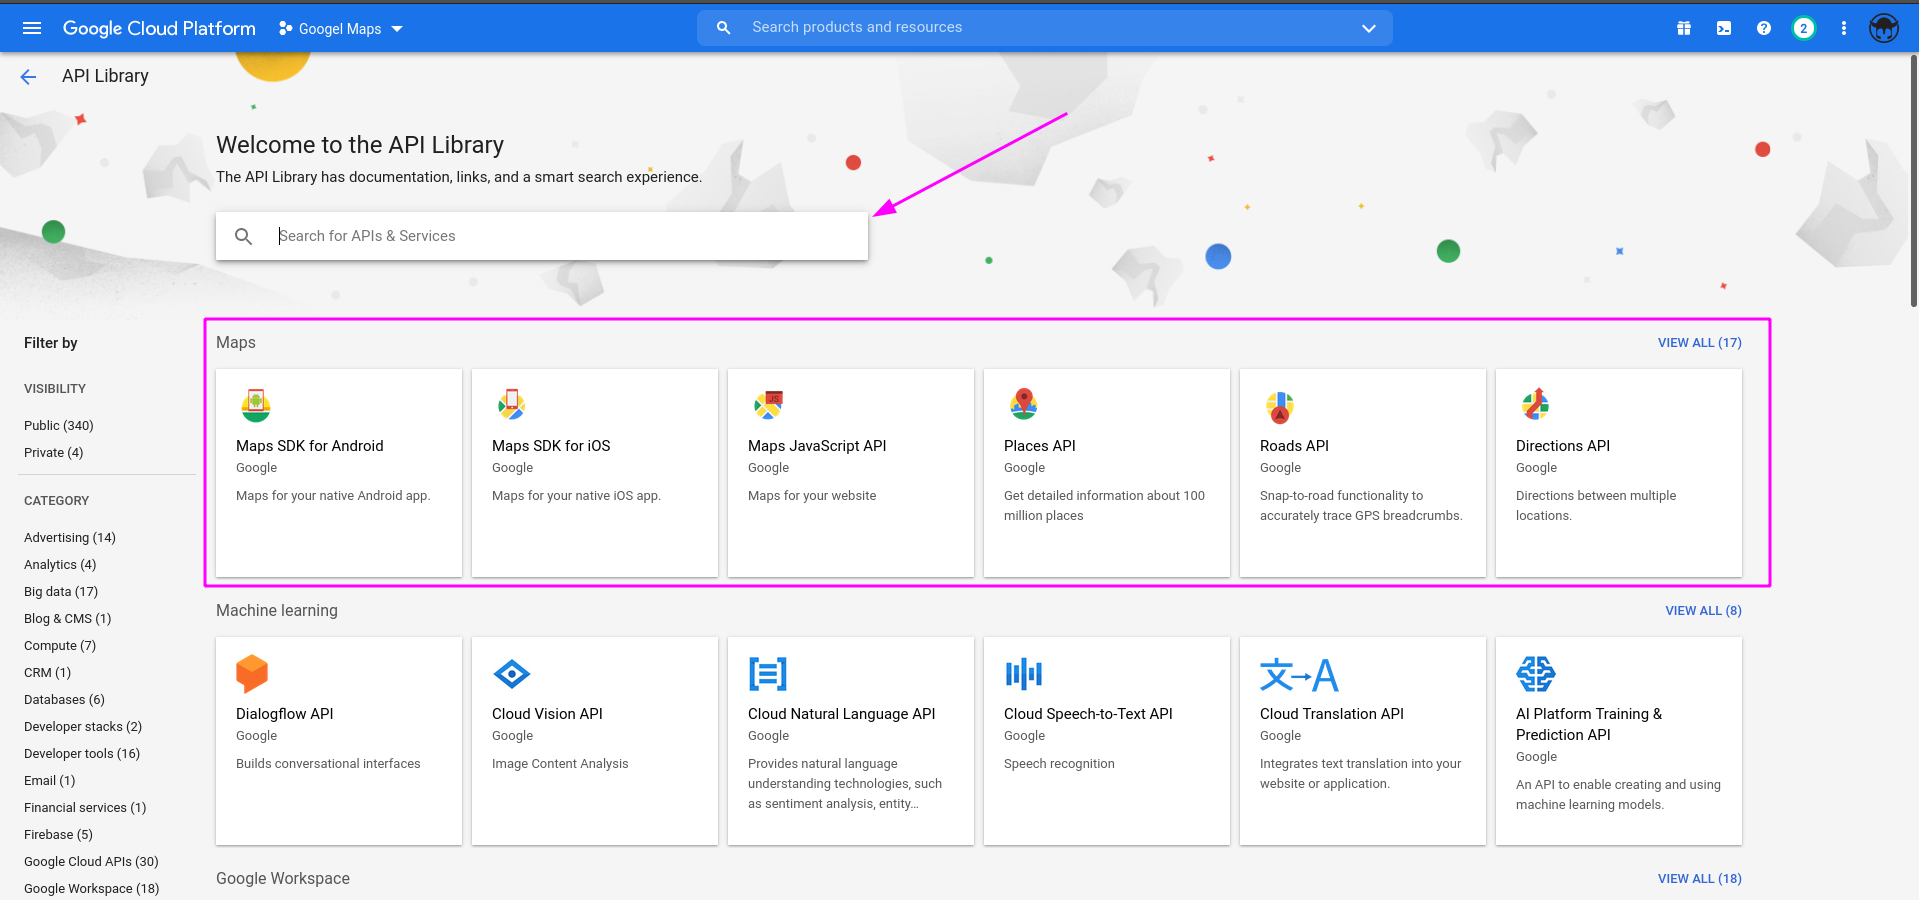
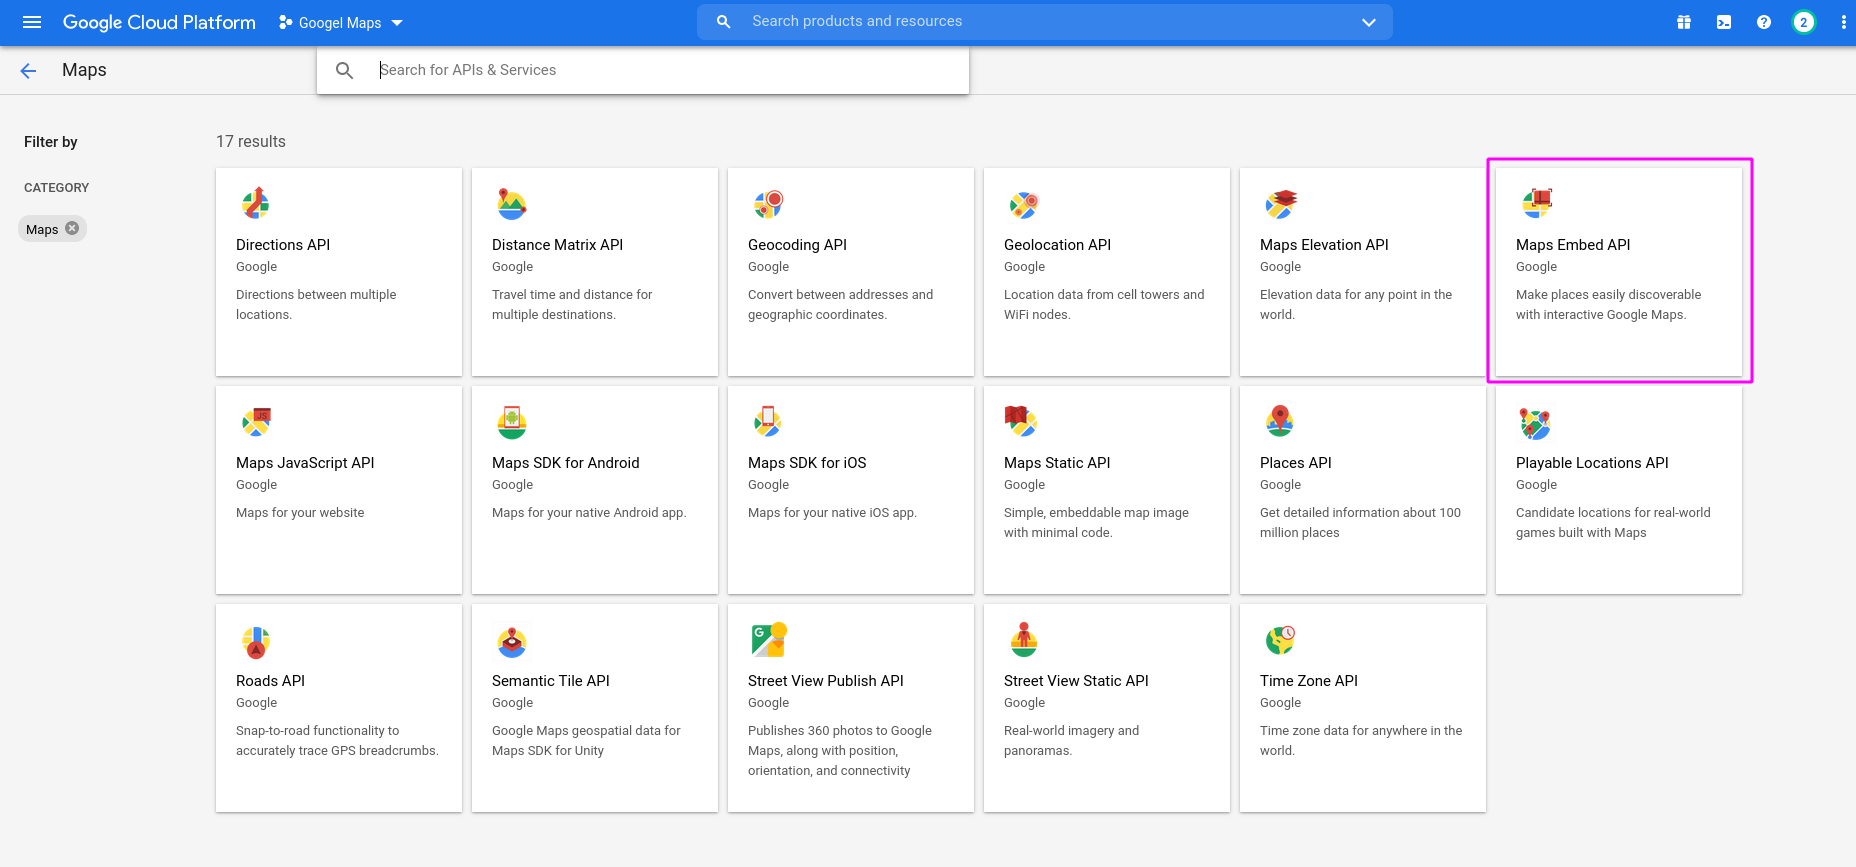
- Then search for or select 'Maps Embed API'

-

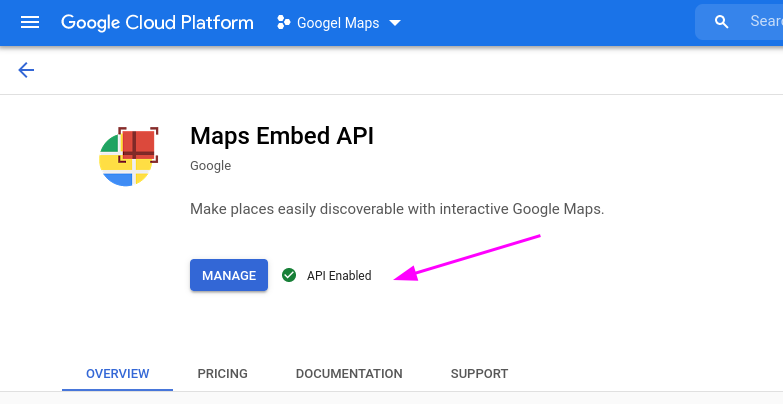
- Ensure this API is Enabled (and if not Enable it)
-

- Congrats! You're done 😁
Getting your Google Tag Manager code
- Go to https://tagmanager.google.com/#/home
- In the section for your account, look for your container and send us the ID displayed in the 'Container ID' column. Note that you may only have one container. If you have none please create one or give us access so we can do that for you (details for how to do that at the top of this entry).
I hope this guide was helpful for you! If you have any questions, please let us know.
Adding tags to Google Tag Manager
Here's a quick guide to help you add tags to your Google Tag Manager account. Once these are set up and published, they will automatically fire on your website (as long as you have sent us your GTM code).
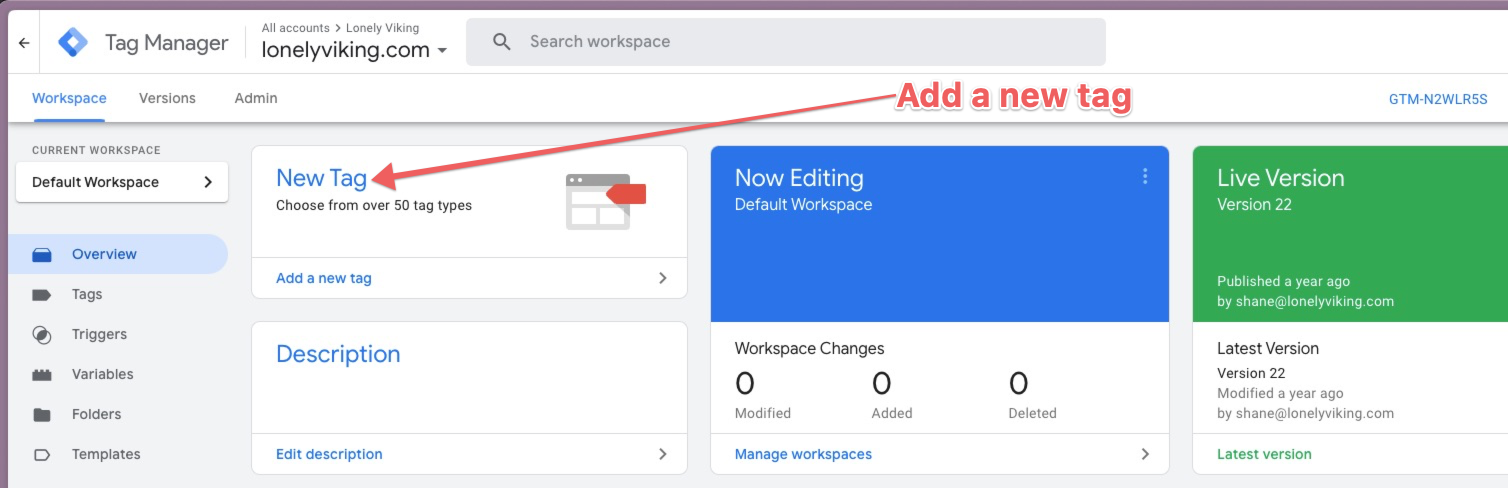
- Add a new tag
- Log in to your GTM account and on the dashboard click to add a new tag:

- Log in to your GTM account and on the dashboard click to add a new tag:
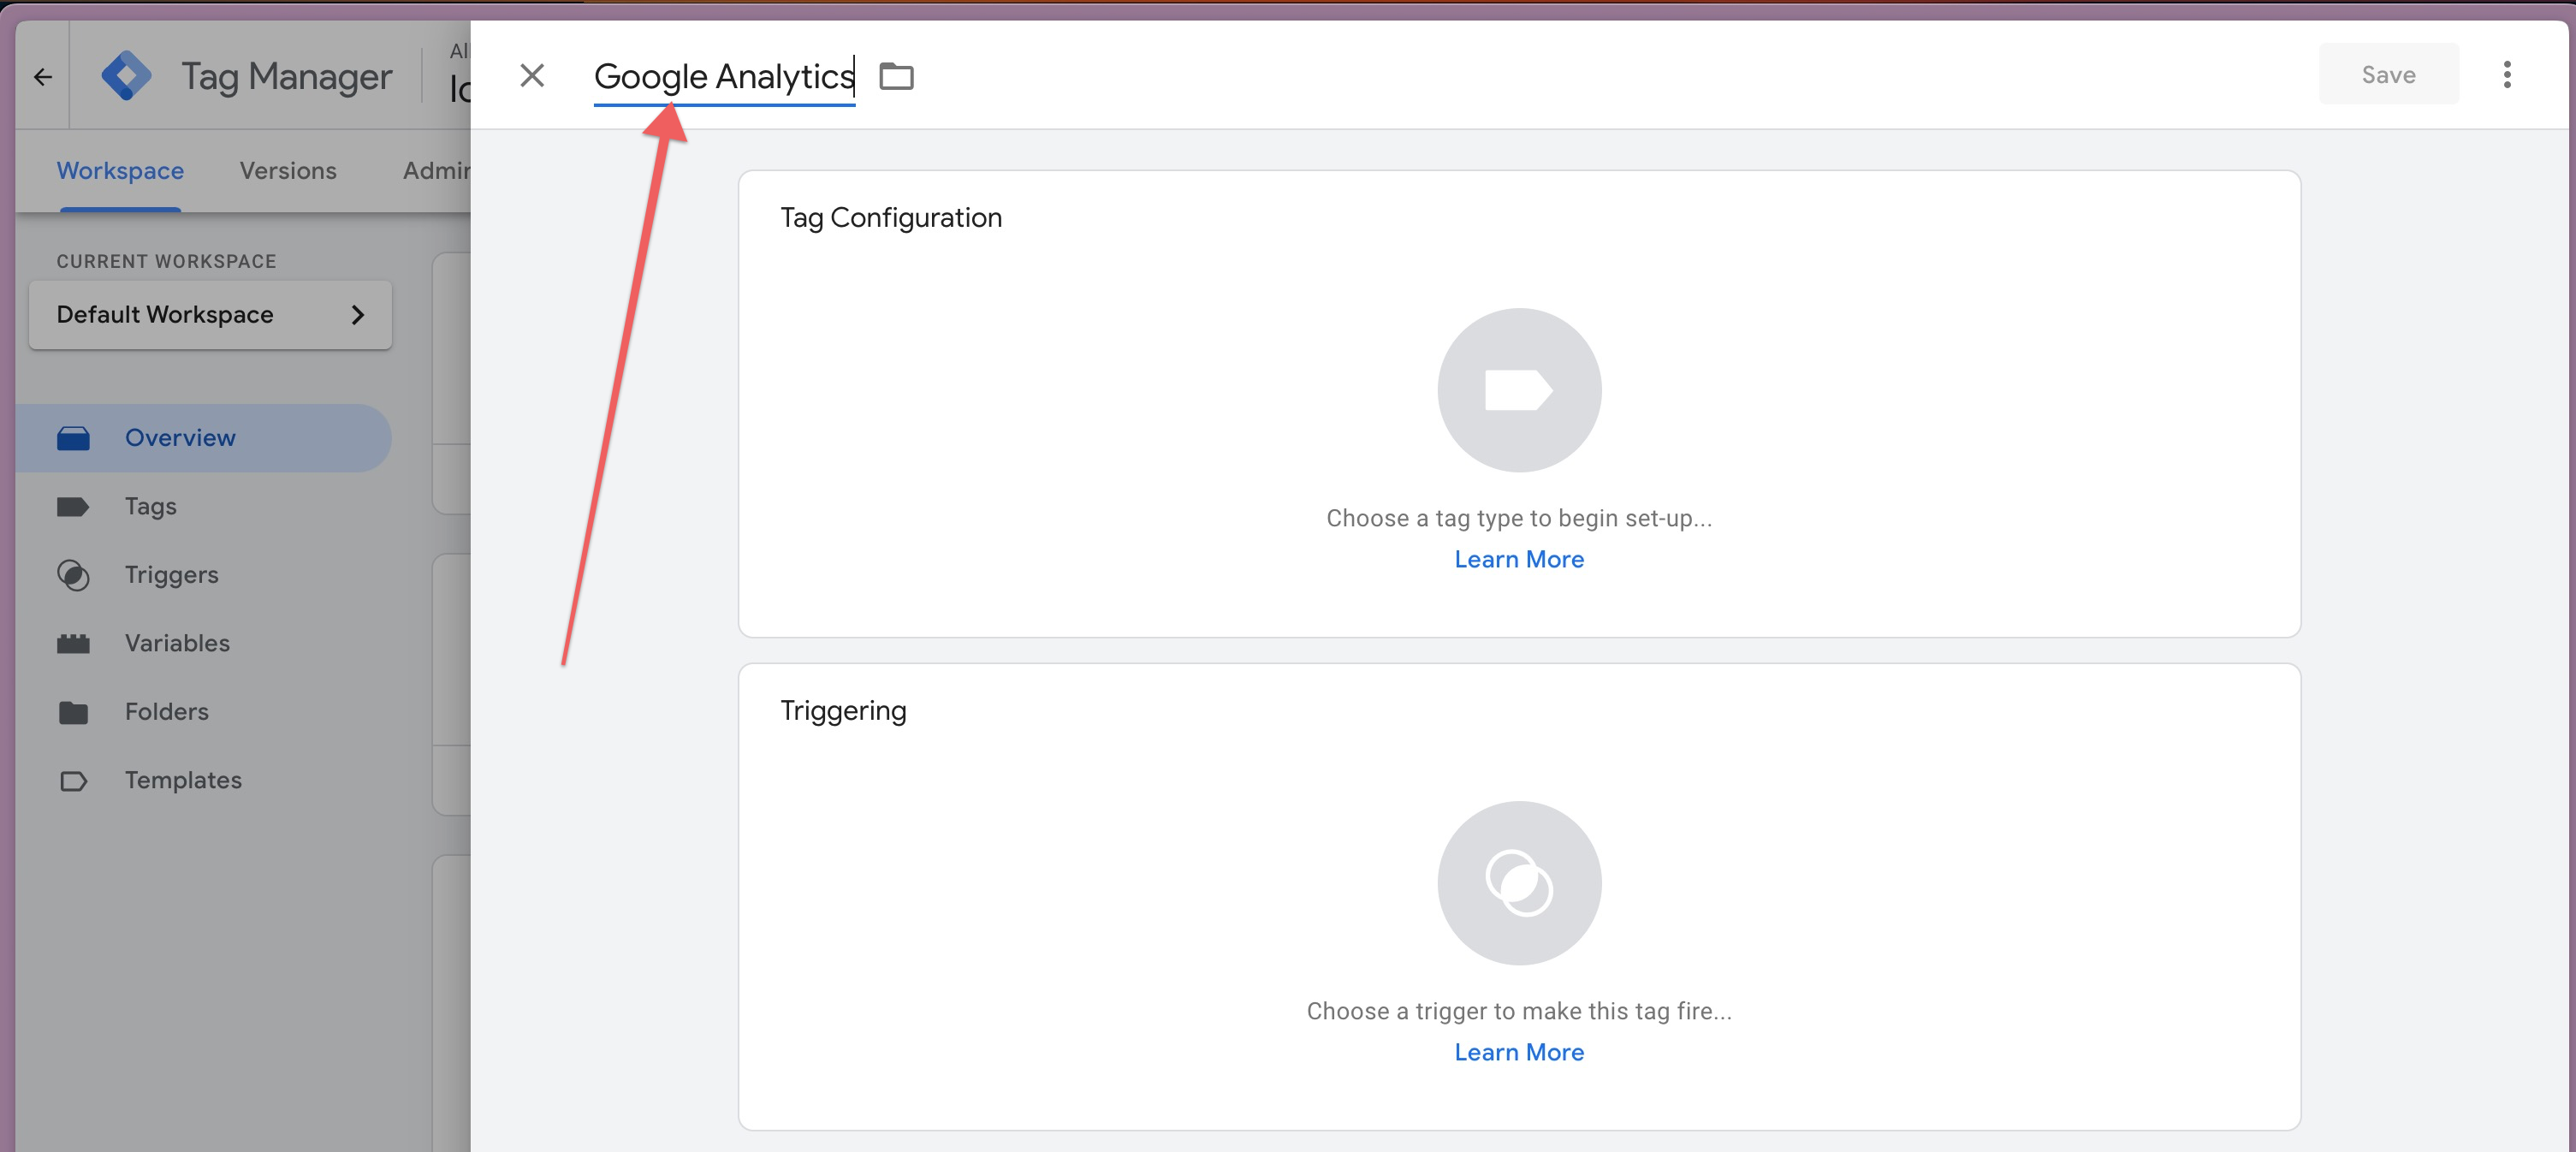
- Set up your new tag
- Name your tag appropriately

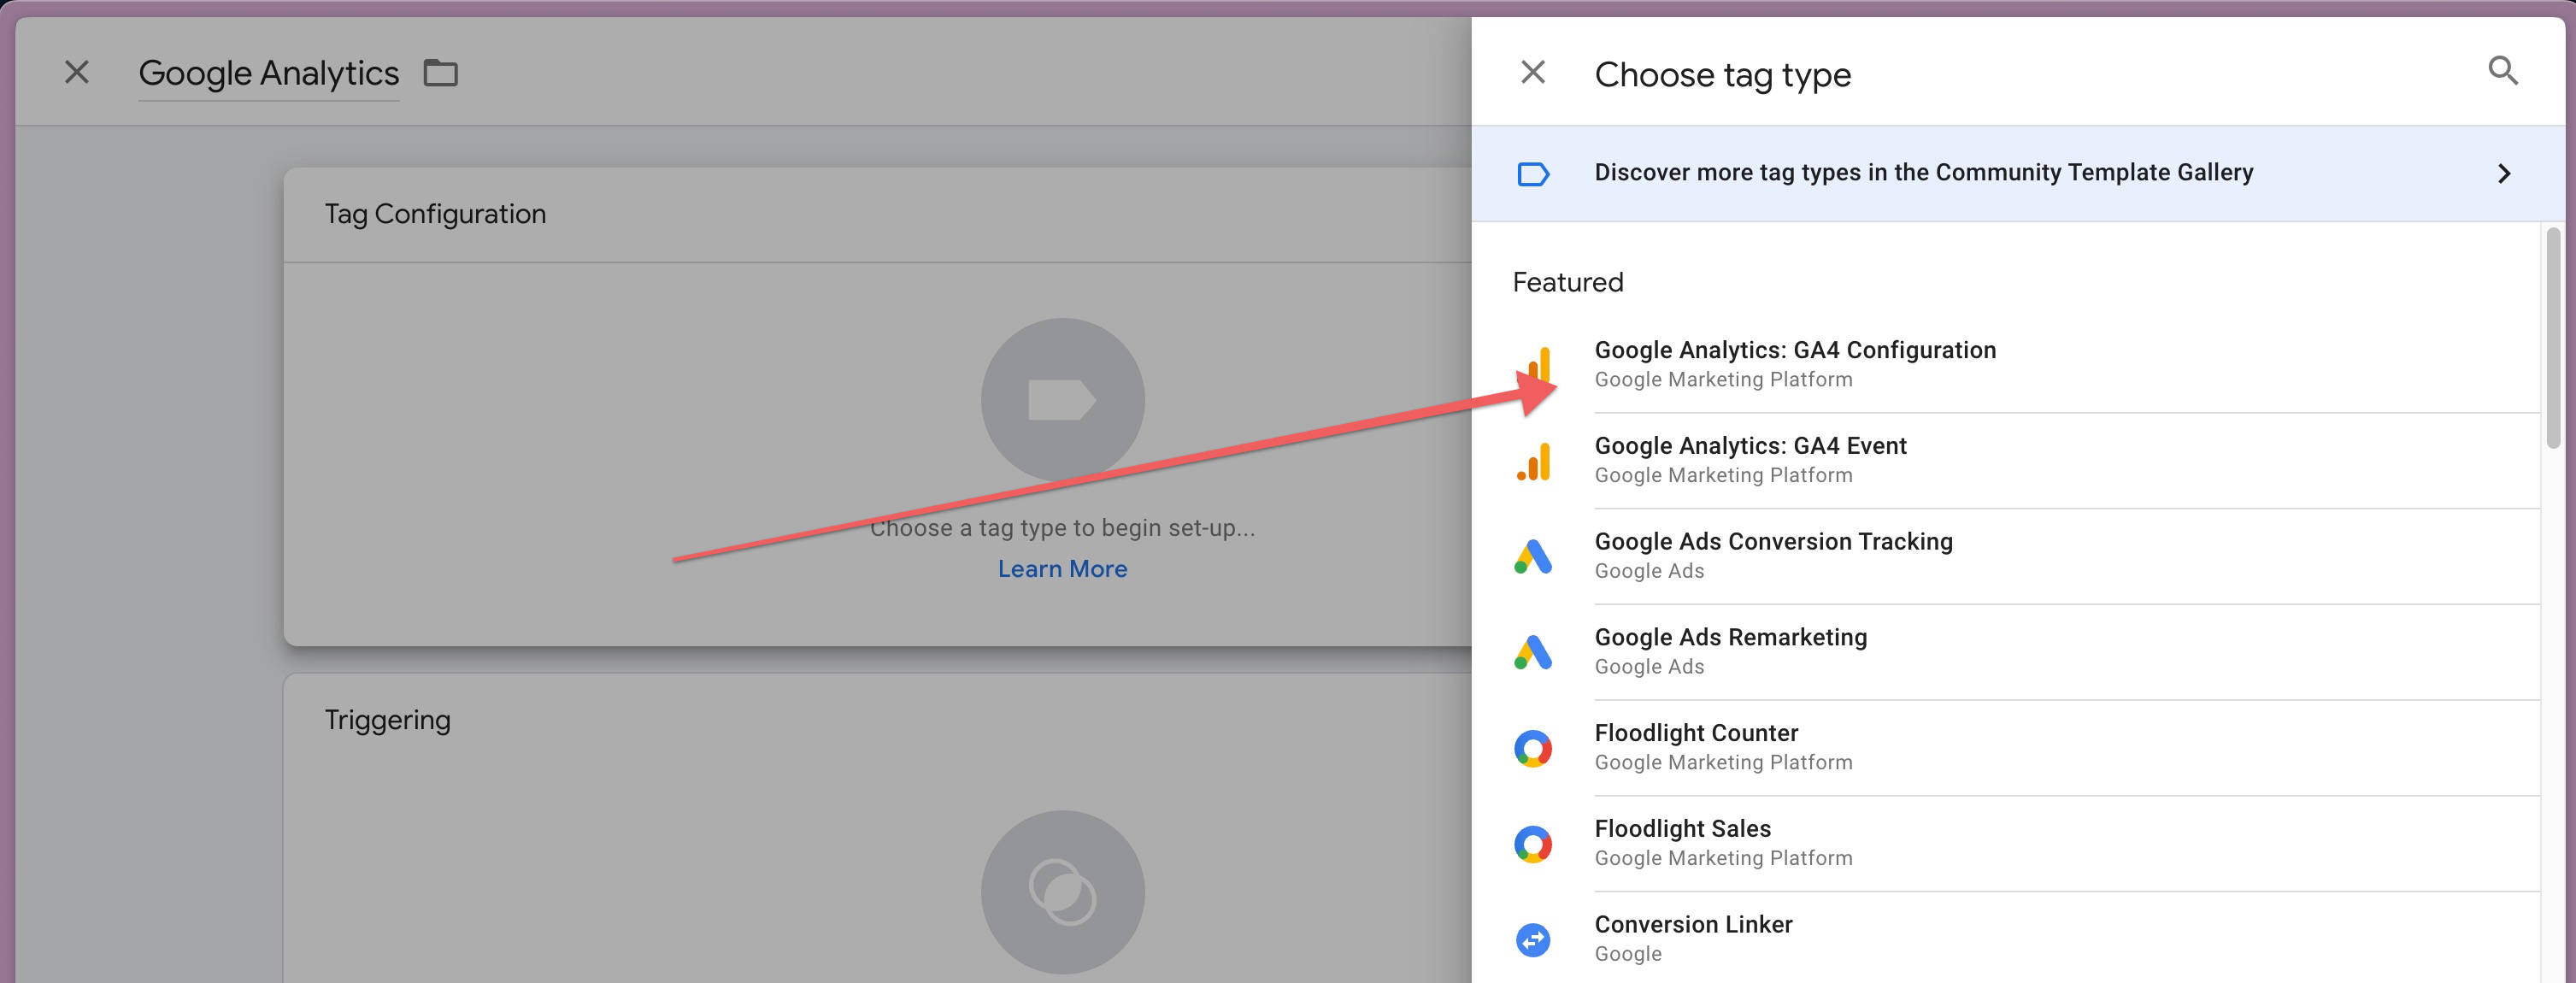
- Click on the 'TabConfiguration' block and select your tag type to set it up

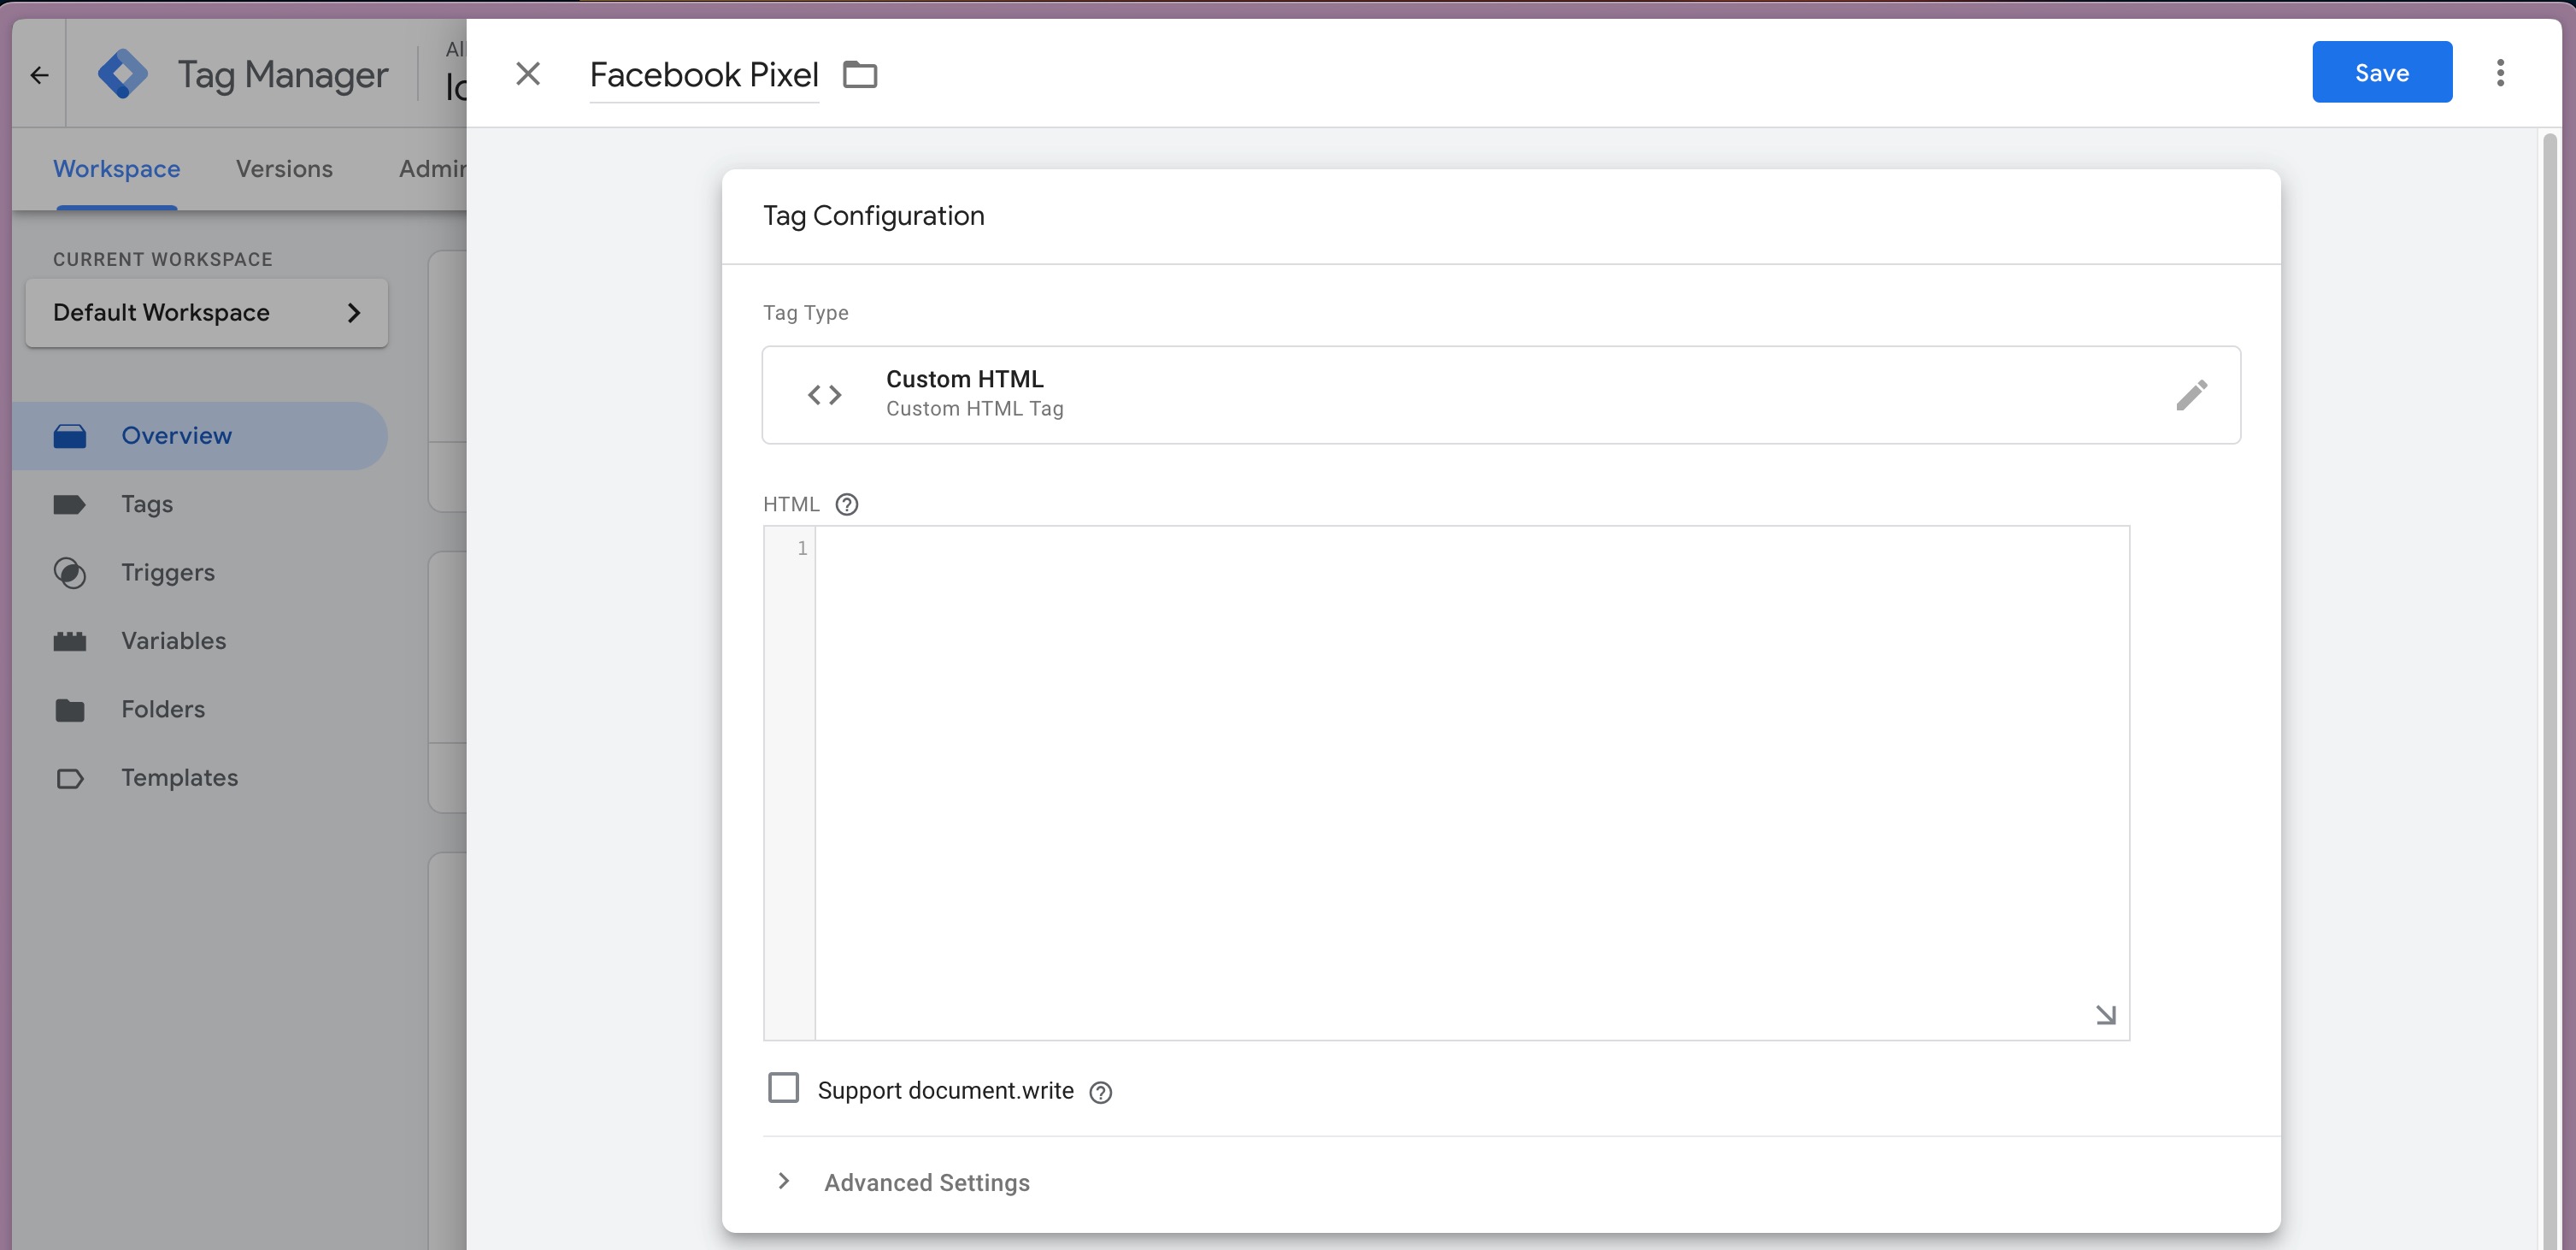
- For any tags that aren't available via a preset (like Facebook Pixel), select the 'Custom HTML' option

- Once selected fill in the appropriate and required details
- Name your tag appropriately
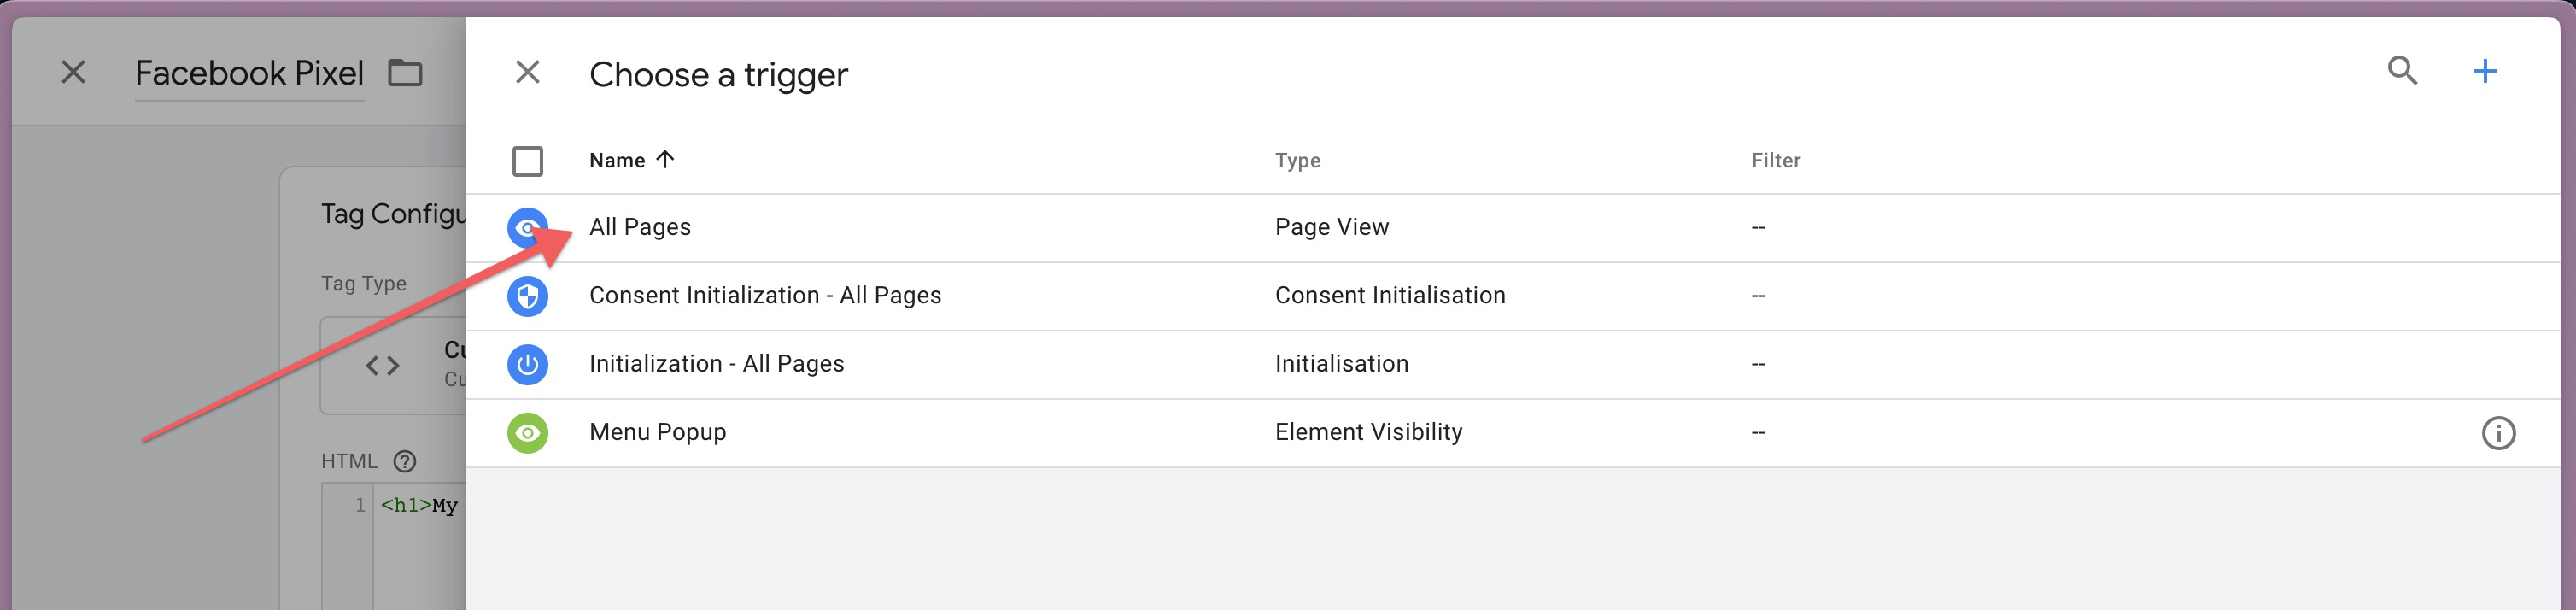
- Set up the Tag Triggering
- Click on the 'Triggering' block
- For most purposes the 'All Pages' option will suffice so go ahead an select that

- When you're done save your tag using the blue save button at the top right
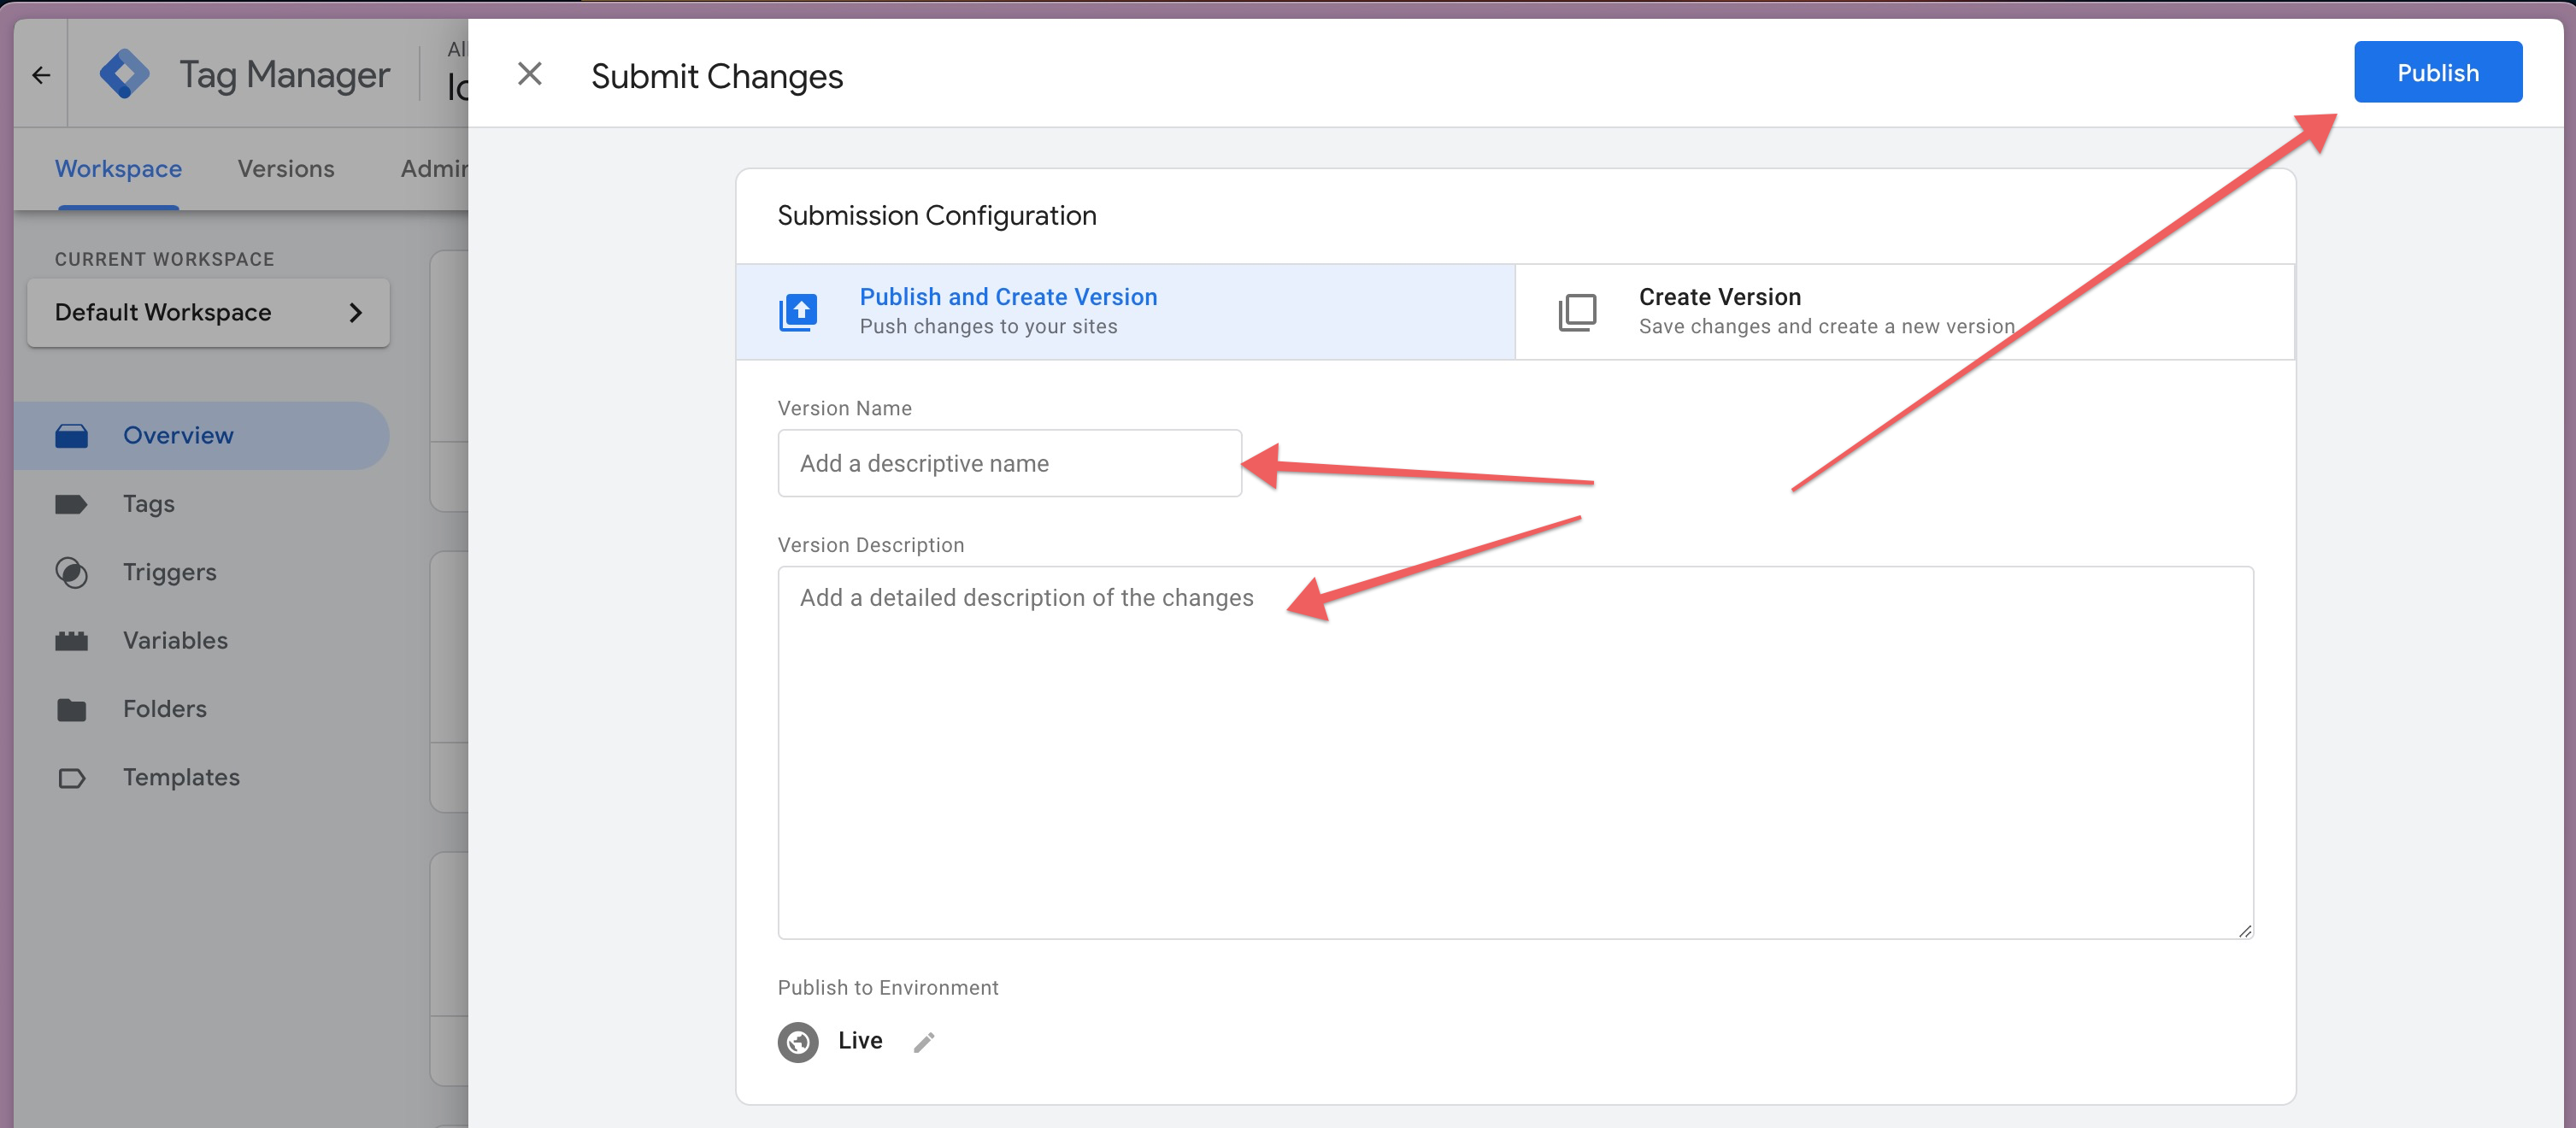
- Submit and publish
- Once you have added all of your desired tags, click the blue 'Submit' button at the top right
- Give your submission a version name and description and click the blue 'Publish' button at the top right

- That's it! Your tags will now fire on your website.